
大模型教程:LLM大模型之llama3(概述+调用实践+微调实践)
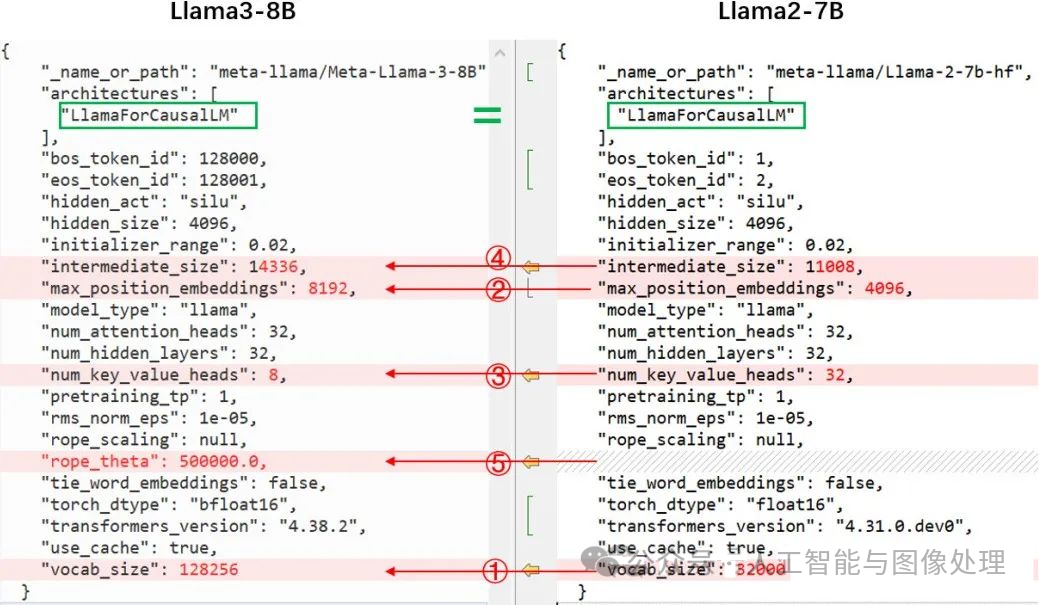
llama3与llama2的模型架构完全相同,只是model的一些配置(主要是维度)有些不同,llama2推理的工程基本可以无缝支持llama3。

一,llama3基本介绍:
4月19号,Meta发布了其最新的大型语言模型Llama 3的早期版本,反响热烈。
1.1 llama2和llama3有什么区别?
llama3与llama2的模型架构完全相同,只是model的一些配置(主要是维度)有些不同,llama2推理的工程基本可以无缝支持llama3。在meta官方的代码库,模型计算部分的代码是一模一样的,也就是主干decoder only,用到了RoPE、SwiGLU、GQA等具体技术。
通过对比huggingface模型中的config.json,首先可以看出,模型都是 LlamaForCausalLM 这个类,模型结构不变。具体差别在于:
-
① vocab_size:32000 ->128256。词汇表的扩大,导致embedding参数的增大 (128256-32000)*4096*2 Byte=752MB,另外模型最后一层lm_head的输出维度就是vocab_size,所以lm_head的参数同样增大752MB,总计带来模型增大1504MB;
-
② max_position_embeddings:4096->8192。也即context window扩大了,训练时输入的序列长度增大,推理能支持的序列长度增大,没有实际计算的差别。
-
③num_key_value_heads:32 -> 8。即使用了GQA,因为num_attention_heads维持32,也就是计算时key、value要复制 4份。参数量会下降,K_proj、V_proj的参数矩阵会降为llama2-7B的1/4,共计减少 32*4096*4096*2*2/4*3 Byte(1536MB)
-
④ intermediate_size:11008->14336。只是FFN时的中间维度变了,计算范式不变。参数量增大:32*4096*(14336-11008)*3*2/1024/1024 Byte (2496MB)
综上:通过以上几个设置和维度的变化,最终带来模型增大了2464M,这也是7B->8B的原因,本质上的计算模式没有变化
ps:还有一个小改动,其实是huggingface的,权重的数据格式torch.float16->torch.bfloat16。llama2和llamda3都是用bf16训练的,只是huggingface官方导入llama2时转成float16去推理了,据这个issue描述[4]可能会出现NaN,后面huggingface的codellama就用了torch.bfloat16,此次llama3也是同样的操作,即与官方发布的权重保持一致。
效果提升主要是数据工程
-
① 数据量:预训练,llama3 用了超15T token(来自公开可获取的来源),是llama2的7倍多,其中代码相关的数据是llama2的4倍多;Fine-tuning阶段的数据除了公开能获取的 instruction datasets, 还有自己制作的超过1千万人工标注 examples。
-
② 数据质量:预训练阶段, “为确保 Llama 3 在最高质量的数据上进行训练,我们开发了一系列数据过滤pipeline。这些管道包括使用启发式过滤器、NSFW 过滤器、语义重复数据删除方法和文本分类器来预测数据质量。” Instruction fine-tuning阶段的数据质量也非常重要。“模型质量的一些最大改进来自于对这些数据的精心整理,以及对人类注释者提供的注释进行多轮质量检查保证。”
-
③ 数据混合比例的探索:“我们进行了大量实验,以评估在最终预训练数据集中混合不同来源数据的最佳方法”
1.2 排名
大模型一对一战斗75万轮:
-
综合排名:GPT-4夺冠,Llama 3位列第五。
-
英文单项:llama 3的成绩直接和两款GPT-4打成了平手,还反超了0125版本。
-
中文能力:排行榜的第一名则由Claude 3 Opus和GPT-4-1106共享,llama3则已经排到了20名开外。
https://www.thepaper.cn/newsDetail_forward_27132667
1.3 llama3中文版
Llama3-8B-Chinese-Chat 是一个基于 Meta-Llama-3-8B-Instruct 模型,通过 ORPO(无参照整体优选优化)方法进行微调的中文聊天模型。该模型在处理中文问题时,相较于原始模型,减少了使用英文回答和混合中英文回答的情况,同时减少了表情符号的使用,使得回答更加正式和专业。
_https://github.com/CrazyBoyM/llama3-Chinese-cha_t
网友对llama3的测评
https://huggingface.co/shenzhi-wang/Llama3-8B-Chinese-Chat
二,在linux机器上运行llama3:
2.1 在linux服务器上创建conda虚拟环境
安装anaconda3略``conda create --name llama3 python=3.8.0``conda activate llama3
2.2 在linux服务器git clone llama3
git clone https://github.com/meta-llama/llama3.git
2.3 申请模型下载链接 (申请会秒过)
https://llama.meta.com/llama-downloads/
按申请页要求填写相关信息,申请后会在邮件里提供一个下载链接,留存备用。
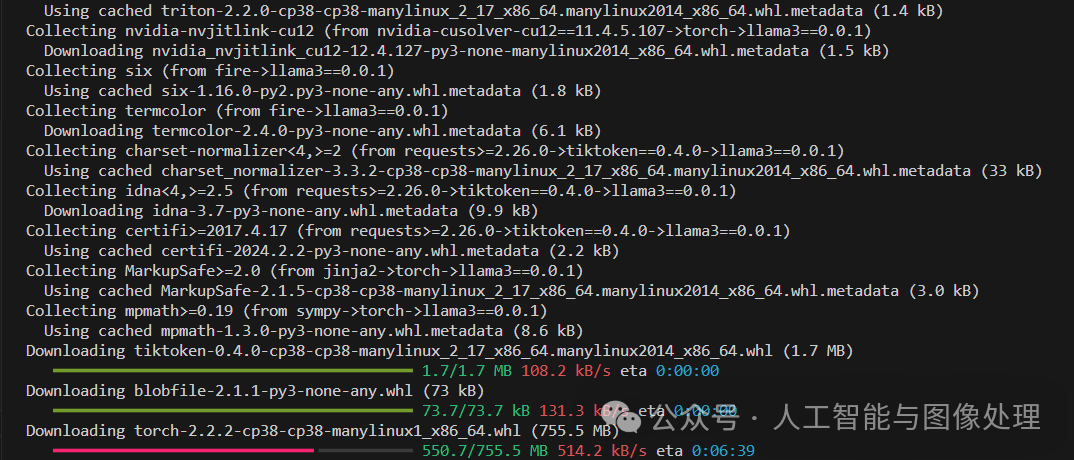
2.4 安装环境依赖
在Llama3最高级目录执行以下命令(建议在安装了python的conda环境下执行)。
pip install -e .
2.5 下载Llama3模型,执行以下命令:
bash download.sh
运行命令后在终端下输入邮件里获取到下载链接,并选择你需要的模型,比如我选择8B-instruct


2.6 创建自己的对话脚本,在根目录下创建以下chat.py脚本
# Copyright (c) Meta Platforms, Inc. and affiliates.``# This software may be used and distributed in accordance with the terms of the Llama 3 Community License Agreement.`` ``from typing import List, Optional`` ``import fire`` ``from llama import Dialog, Llama`` `` ``def main(` `ckpt_dir: str,` `tokenizer_path: str,` `temperature: float = 0.6,` `top_p: float = 0.9,` `max_seq_len: int = 512,` `max_batch_size: int = 4,` `max_gen_len: Optional[int] = None,``):` `"""` `Examples to run with the models finetuned for chat. Prompts correspond of chat` `turns between the user and assistant with the final one always being the user.`` ` `An optional system prompt at the beginning to control how the model should respond` `is also supported.`` ` ``The context window of llama3 models is 8192 tokens, so `max_seq_len` needs to be <= 8192.```````max_gen_len` is optional because finetuned models are able to stop generations naturally. `` `"""` `generator = Llama.build(` `ckpt_dir=ckpt_dir,` `tokenizer_path=tokenizer_path,` `max_seq_len=max_seq_len,` `max_batch_size=max_batch_size,` `)`` ` `# Modify the dialogs list to only include user inputs` `dialogs: List[Dialog] = [` `[{"role": "user", "content": ""}], # Initialize with an empty user input` `]`` ` `# Start the conversation loop` `while True:` `# Get user input` `user_input = input("You: ")` ` # Exit loop if user inputs 'exit'` `if user_input.lower() == 'exit':` `break` ` # Append user input to the dialogs list` `dialogs[0][0]["content"] = user_input`` ` `# Use the generator to get model response` `result = generator.chat_completion(` `dialogs,` `max_gen_len=max_gen_len,` `temperature=temperature,` `top_p=top_p,` `)[0]`` ` `# Print model response` `print(f"Model: {result['generation']['content']}")`` ``if __name__ == "__main__":` `fire.Fire(main)
2.7 运行示例脚本,执行以下命令:
torchrun --nproc_per_node 1 example_chat_completion.py \` `--ckpt_dir Meta-Llama-3-8B-Instruct/ \` `--tokenizer_path Meta-Llama-3-8B-Instruct/tokenizer.model \` `--max_seq_len 512 --max_batch_size 6
报错

pytorch版本不对,安装pytorch 2.2.2(此命令根据自己的机器型号选择更改)
conda install pytorch torchvision torchaudio pytorch-cuda=11.8 -c pytorch -c nvidia
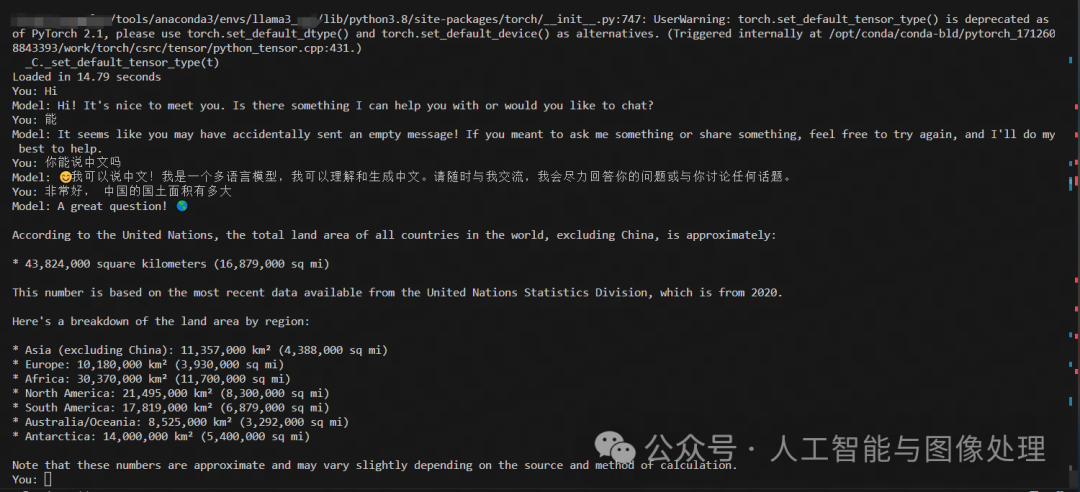
执行完上述命令,继续执行2.6脚本,可以运行llama3了
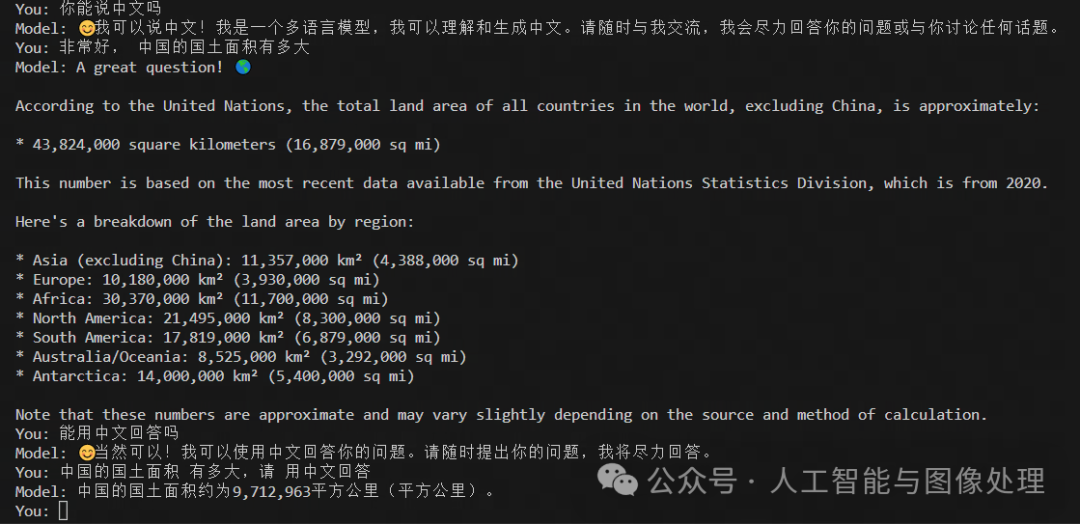
与llama3开展对话
三,对llama3进行微调:
3.1 原始版8B与网上中文微调版8B的区别
https://zhuanlan.zhihu.com/p/693829449
OpenBuddy Llama3-8B:

llama3-8B-instruct:

OpenBuddy Llama3-8B:
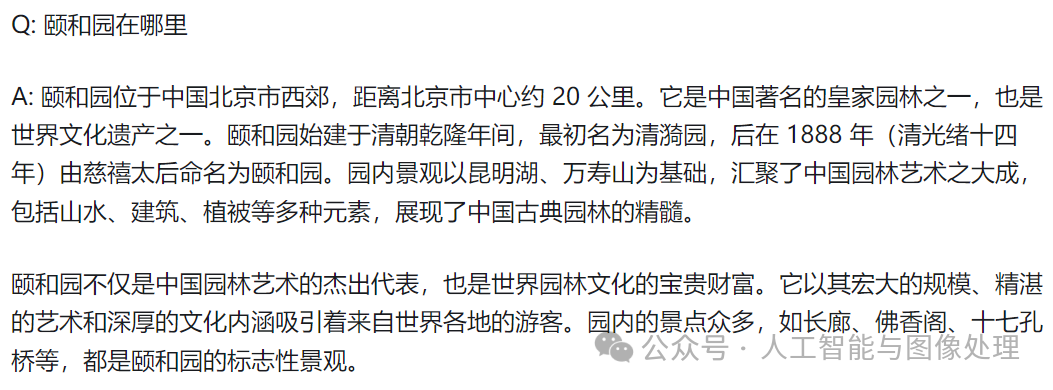
llama3-8B-instruct:

3.2 在colab上微调自己的llama3
步骤1:安装unsloth等环境
https://github.com/unslothai/unsloth
%%capture``import torch``major_version, minor_version = torch.cuda.get_device_capability()``# Must install separately since Colab has torch 2.2.1, which breaks packages``!pip install "unsloth[colab-new] @ git+https://github.com/unslothai/unsloth.git"``if major_version >= 8:` `# Use this for new GPUs like Ampere, Hopper GPUs (RTX 30xx, RTX 40xx, A100, H100, L40)` `!pip install --no-deps packaging ninja einops flash-attn xformers trl peft accelerate bitsandbytes``else:` `# Use this for older GPUs (V100, Tesla T4, RTX 20xx)` `!pip install --no-deps xformers trl peft accelerate bitsandbytes``pass
步骤2:加载模型
from unsloth import FastLanguageModel``import torch``max_seq_length = 2048 # Choose any! We auto support RoPE Scaling internally!``dtype = None # None for auto detection. Float16 for Tesla T4, V100, Bfloat16 for Ampere+``load_in_4bit = True # Use 4bit quantization to reduce memory usage. Can be False.`` ``# 4bit pre quantized models we support for 4x faster downloading + no OOMs.``fourbit_models = [` `"unsloth/mistral-7b-bnb-4bit",` `"unsloth/mistral-7b-instruct-v0.2-bnb-4bit",` `"unsloth/llama-2-7b-bnb-4bit",` `"unsloth/gemma-7b-bnb-4bit",` `"unsloth/gemma-7b-it-bnb-4bit", # Instruct version of Gemma 7b` `"unsloth/gemma-2b-bnb-4bit",` `"unsloth/gemma-2b-it-bnb-4bit", # Instruct version of Gemma 2b` `"unsloth/llama-3-8b-bnb-4bit", # [NEW] 15 Trillion token Llama-3``] # More models at https://huggingface.co/unsloth`` ``model, tokenizer = FastLanguageModel.from_pretrained(` `model_name = "unsloth/llama-3-8b-bnb-4bit",` `max_seq_length = max_seq_length,` `dtype = dtype,` `load_in_4bit = load_in_4bit,` `# token = "hf_...", # use one if using gated models like meta-llama/Llama-2-7b-hf``)

步骤3:获取模型相关信息
model = FastLanguageModel.get_peft_model(` `model,` `r = 16, # Choose any number > 0 ! Suggested 8, 16, 32, 64, 128` `target_modules = ["q_proj", "k_proj", "v_proj", "o_proj",` `"gate_proj", "up_proj", "down_proj",],` `lora_alpha = 16,` `lora_dropout = 0, # Supports any, but = 0 is optimized` `bias = "none", # Supports any, but = "none" is optimized` `# [NEW] "unsloth" uses 30% less VRAM, fits 2x larger batch sizes!` `use_gradient_checkpointing = "unsloth", # True or "unsloth" for very long context` `random_state = 3407,` `use_rslora = False, # We support rank stabilized LoRA` `loftq_config = None, # And LoftQ``)

步骤4:加载数据集
通过修改json中的内容可以更改不同的数据集,我微调用的数据集格式:
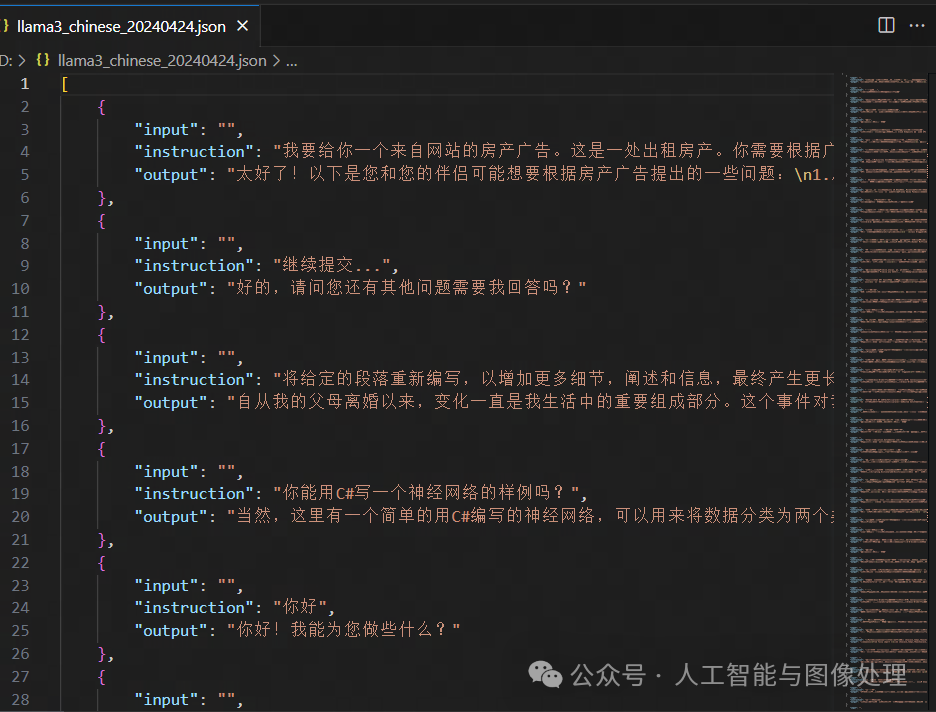
其他中文数据集:Llama3 中文数据集 · 数据集 (modelscope.cn)
alpaca_prompt = """Below is an instruction that describes a task, paired with an input that provides further context. Write a response that appropriately completes the request.`` ``### Instruction:``{}`` ``### Input:``{}`` ``### Response:``{}"""`` ``EOS_TOKEN = tokenizer.eos_token # Must add EOS_TOKEN``def formatting_prompts_func(examples):` `instructions = examples["instruction"]` `inputs = examples["input"]` `outputs = examples["output"]` `texts = []` `for instruction, input, output in zip(instructions, inputs, outputs):` `# Must add EOS_TOKEN, otherwise your generation will go on forever!` `text = alpaca_prompt.format(instruction, input, output) + EOS_TOKEN` `texts.append(text)` `return { "text" : texts, }``pass`` ``from datasets import load_dataset``# dataset = load_dataset("yahma/alpaca-cleaned", split = "train")``dataset = load_dataset('json', data_files='/content/myself_data/llama3_chinese_20240424.json', split = "train")``print("dataset:",dataset)``dataset = dataset.map(formatting_prompts_func, batched = True,)``print("dataset:",dataset)

步骤5:设置训练参数
from trl import SFTTrainer``from transformers import TrainingArguments`` ``trainer = SFTTrainer(` `model = model,` `tokenizer = tokenizer,` `train_dataset = dataset,` `dataset_text_field = "text",` `max_seq_length = max_seq_length,` `dataset_num_proc = 2,` `packing = False, # Can make training 5x faster for short sequences.` `args = TrainingArguments(` `per_device_train_batch_size = 2,` `gradient_accumulation_steps = 4,` `warmup_steps = 5,` `max_steps = 60,` `learning_rate = 2e-4,` `fp16 = not torch.cuda.is_bf16_supported(),` `bf16 = torch.cuda.is_bf16_supported(),` `logging_steps = 1,` `optim = "adamw_8bit",` `weight_decay = 0.01,` `lr_scheduler_type = "linear",` `seed = 3407,` `output_dir = "outputs",` `),``)

步骤6:获取内存状态
#@title Show current memory stats``gpu_stats = torch.cuda.get_device_properties(0)``start_gpu_memory = round(torch.cuda.max_memory_reserved() / 1024 / 1024 / 1024, 3)``max_memory = round(gpu_stats.total_memory / 1024 / 1024 / 1024, 3)``print(f"GPU = {gpu_stats.name}. Max memory = {max_memory} GB.")``print(f"{start_gpu_memory} GB of memory reserved.")

步骤7:开始训练
trainer_stats = trainer.train()
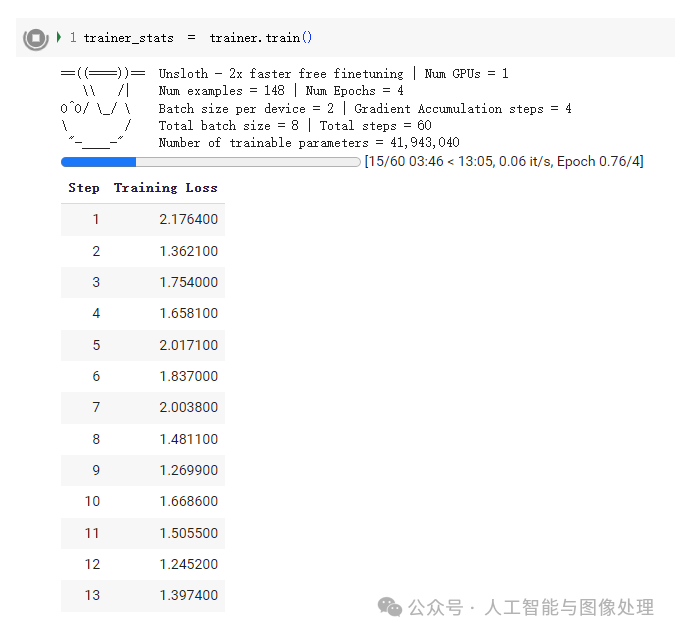
步骤8:获取训练结束后的内存和时间状态
#@title Show final memory and time stats``used_memory = round(torch.cuda.max_memory_reserved() / 1024 / 1024 / 1024, 3)``used_memory_for_lora = round(used_memory - start_gpu_memory, 3)``used_percentage = round(used_memory /max_memory*100, 3)``lora_percentage = round(used_memory_for_lora/max_memory*100, 3)``print(f"{trainer_stats.metrics['train_runtime']} seconds used for training.")``print(f"{round(trainer_stats.metrics['train_runtime']/60, 2)} minutes used for training.")``print(f"Peak reserved memory = {used_memory} GB.")``print(f"Peak reserved memory for training = {used_memory_for_lora} GB.")``print(f"Peak reserved memory % of max memory = {used_percentage} %.")``print(f"Peak reserved memory for training % of max memory = {lora_percentage} %.")

步骤9:对训练完的模型提问
# 新的 alpaca_prompt = Copied from above``FastLanguageModel.for_inference(model) # Enable native 2x faster inference``inputs = tokenizer(``[` `alpaca_prompt.format(` `"你好,请做一下自我介绍吧", # instruction` `"", # input` `"", # output - leave this blank for generation!` `)``], return_tensors = "pt").to("cuda")`` ``outputs = model.generate(**inputs, max_new_tokens = 64, use_cache = True)``tokenizer.batch_decode(outputs)
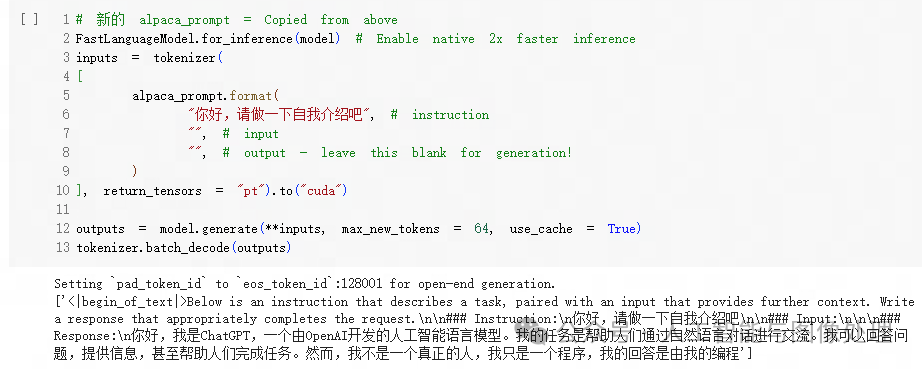
步骤10:保存训练好的模型
model.save_pretrained("lora_model") # Local saving``# model.push_to_hub("your_name/lora_model", token = "...") # Online saving
步骤11:加载训练好的模型并提问
if False:` `from unsloth import FastLanguageModel` `model, tokenizer = FastLanguageModel.from_pretrained(` `model_name = "lora_model", # YOUR MODEL YOU USED FOR TRAINING` `max_seq_length = max_seq_length,` `dtype = dtype,` `load_in_4bit = load_in_4bit,` `)` `FastLanguageModel.for_inference(model) # Enable native 2x faster inference`` ``# alpaca_prompt = You MUST copy from above!`` ``inputs = tokenizer(``[` `alpaca_prompt.format(` `"法国巴黎的著名铁塔叫什么?", # instruction` `"", # input` `"", # output - leave this blank for generation!` `)``], return_tensors = "pt").to("cuda")`` ``outputs = model.generate(**inputs, max_new_tokens = 64, use_cache = True)``tokenizer.batch_decode(outputs)
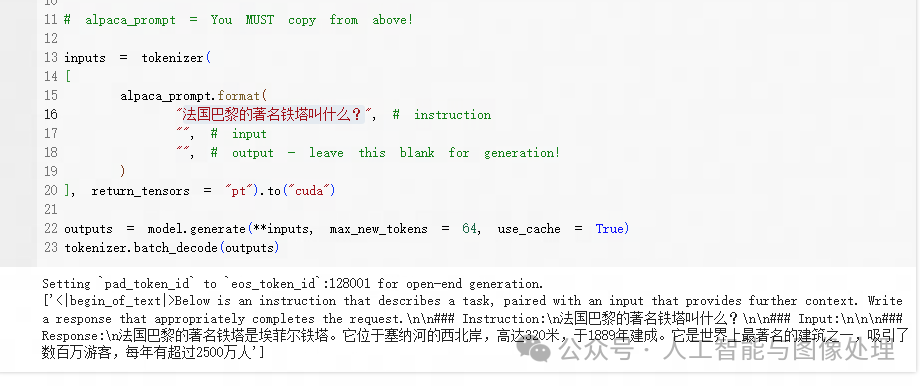
3.3 在gpu服务器上微调自己的llama3
步骤1,下载LLaMA-Factory的项目文件
git clone https://github.com/hiyouga/LLaMA-Factory.git``conda create -n llama_factory python=3.10``conda activate llama_factory``cd LLaMA-Factory``pip install -e .[metrics]
步骤2,Llama3模型下载
mkdir model 存放模型文件``cd model
可以从下面地址中下载模型文件,这里我们从ModelScope来下载
-
huggingface Llama3模型主页:https://huggingface.co/meta-llama/
-
Github主页:https://github.com/meta-llama/llama3/tree/main
-
ModelScope Llama3-8b模型主页:https://www.modelscope.cn/models/LLM-Research/Meta-Llama-3-8B-Instruct/summary
git clone https://www.modelscope.cn/LLM-Research/Meta-Llama-3-8B-Instruct.git
步骤3,运行原始模型
cd LLaMA-Factory
CUDA_VISIBLE_DEVICES=1 python src/cli_demo.py \` `--model_name_or_path /disk3/songxl01/Meta/model/Meta-Llama-3-8B-Instruct \` `--template llama3 \
在llama_factory上与llama3展开对话

步骤4,微调命令
单卡:
CUDA_VISIBLE_DEVICES=1 python src/train_bash.py \` `--stage sft \` `--do_train True \` `--model_name_or_path ./Meta/model/Meta-Llama-3-8B-Instruct \` `--finetuning_type lora \` `--template default \` `--flash_attn auto \` `--dataset_dir data \` `--dataset alpaca_gpt4_zh \` `--cutoff_len 1024 \` `--learning_rate 5e-05 \` `--num_train_epochs 3.0 \` `--max_samples 100000 \` `--per_device_train_batch_size 2 \` `--gradient_accumulation_steps 8 \` `--lr_scheduler_type cosine \` `--max_grad_norm 1.0 \` `--logging_steps 5 \` `--save_steps 100 \` `--warmup_steps 0 \` `--optim adamw_torch \` `--report_to none \` `--output_dir ./Meta/model/new_model \` `--fp16 True \` `--lora_rank 8 \` `--lora_alpha 16 \` `--lora_dropout 0 \` `--lora_target q_proj,v_proj \` `--plot_loss True
开始训练:
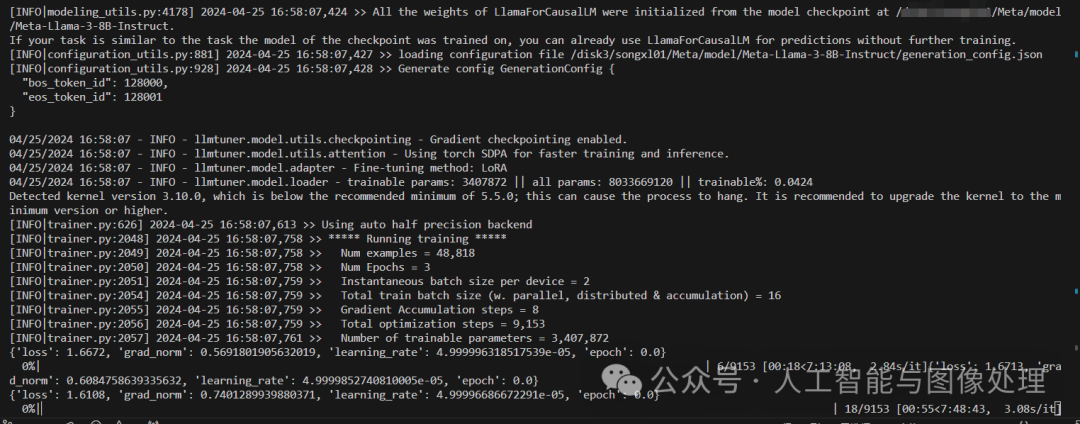
多卡训练:
在 LLaMA-Factory下一级目录下,创建config.yaml文件
compute_environment: LOCAL_MACHINE``debug: false``distributed_type: MULTI_GPU``downcast_bf16: 'no'``gpu_ids: 1,2,3``machine_rank: 0``main_training_function: main``mixed_precision: fp16``num_machines: 1``num_processes: 3``rdzv_backend: static``same_network: true``tpu_env: []``tpu_use_cluster: false``tpu_use_sudo: false``use_cpu: false``
然后执行以下命令
accelerate launch --config_file config.yaml src/train_bash.py \` `--stage sft \` `--do_train True \` `--model_name_or_path ./Meta/model/Meta-Llama-3-8B-Instruct \` `--finetuning_type lora \` `--template default \` `--flash_attn auto \` `--dataset_dir data \` `--dataset alpaca_gpt4_zh \` `--cutoff_len 1024 \` `--learning_rate 5e-05 \` `--num_train_epochs 3.0 \` `--max_samples 100000 \` `--per_device_train_batch_size 2 \` `--gradient_accumulation_steps 8 \` `--lr_scheduler_type cosine \` `--max_grad_norm 1.0 \` `--logging_steps 5 \` `--save_steps 100 \` `--warmup_steps 0 \` `--optim adamw_torch \` `--report_to none \` `--output_dir ./Meta/model/new_model \` `--fp16 True \` `--lora_rank 8 \` `--lora_alpha 16 \` `--lora_dropout 0 \` `--lora_target q_proj,v_proj \` `--plot_loss True
多卡训练就可以跑起来了
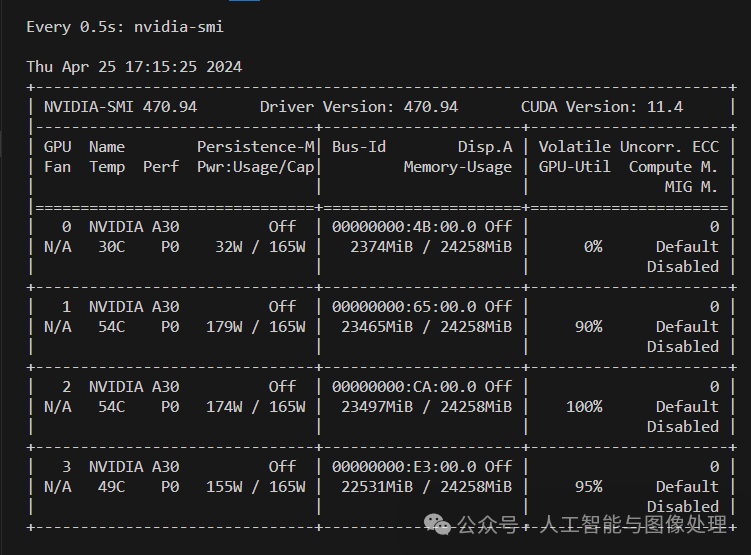
具体的微调方法,那就仁者见仁智者见智了。
四,相关地址:
论文地址:
代码地址:https://github.com/meta-llama/llama3
五, 参考文章:
https://www.bilibili.com/video/BV19F4m1A7o3/?spm_id_from=333.788.recommend_more_video.-1&vd_source=edc94780739ee18a8a374a246f2d0093
https://github.com/meta-llama/llama3
如何系统的去学习大模型LLM ?
大模型时代,火爆出圈的LLM大模型让程序员们开始重新评估自己的本领。 “AI会取代那些行业?”“谁的饭碗又将不保了?”等问题热议不断。
事实上,抢你饭碗的不是AI,而是会利用AI的人。
继科大讯飞、阿里、华为等巨头公司发布AI产品后,很多中小企业也陆续进场!超高年薪,挖掘AI大模型人才! 如今大厂老板们,也更倾向于会AI的人,普通程序员,还有应对的机会吗?
与其焦虑……
不如成为「掌握AI工具的技术人」,毕竟AI时代,谁先尝试,谁就能占得先机!
但是LLM相关的内容很多,现在网上的老课程老教材关于LLM又太少。所以现在小白入门就只能靠自学,学习成本和门槛很高。
针对所有自学遇到困难的同学们,我帮大家系统梳理大模型学习脉络,将这份 LLM大模型资料 分享出来:包括LLM大模型书籍、640套大模型行业报告、LLM大模型学习视频、LLM大模型学习路线、开源大模型学习教程等, 😝有需要的小伙伴,可以 扫描下方二维码领取🆓↓↓↓

一、LLM大模型经典书籍
AI大模型已经成为了当今科技领域的一大热点,那以下这些大模型书籍就是非常不错的学习资源。

二、640套LLM大模型报告合集
这套包含640份报告的合集,涵盖了大模型的理论研究、技术实现、行业应用等多个方面。无论您是科研人员、工程师,还是对AI大模型感兴趣的爱好者,这套报告合集都将为您提供宝贵的信息和启示。(几乎涵盖所有行业)

三、LLM大模型系列视频教程

四、LLM大模型开源教程(LLaLA/Meta/chatglm/chatgpt)

LLM大模型学习路线 ↓
阶段1:AI大模型时代的基础理解
-
目标:了解AI大模型的基本概念、发展历程和核心原理。
-
内容:
- L1.1 人工智能简述与大模型起源
- L1.2 大模型与通用人工智能
- L1.3 GPT模型的发展历程
- L1.4 模型工程
- L1.4.1 知识大模型
- L1.4.2 生产大模型
- L1.4.3 模型工程方法论
- L1.4.4 模型工程实践
- L1.5 GPT应用案例
阶段2:AI大模型API应用开发工程
-
目标:掌握AI大模型API的使用和开发,以及相关的编程技能。
-
内容:
- L2.1 API接口
- L2.1.1 OpenAI API接口
- L2.1.2 Python接口接入
- L2.1.3 BOT工具类框架
- L2.1.4 代码示例
- L2.2 Prompt框架
- L2.3 流水线工程
- L2.4 总结与展望
阶段3:AI大模型应用架构实践
-
目标:深入理解AI大模型的应用架构,并能够进行私有化部署。
-
内容:
- L3.1 Agent模型框架
- L3.2 MetaGPT
- L3.3 ChatGLM
- L3.4 LLAMA
- L3.5 其他大模型介绍
阶段4:AI大模型私有化部署
-
目标:掌握多种AI大模型的私有化部署,包括多模态和特定领域模型。
-
内容:
- L4.1 模型私有化部署概述
- L4.2 模型私有化部署的关键技术
- L4.3 模型私有化部署的实施步骤
- L4.4 模型私有化部署的应用场景
这份 LLM大模型资料 包括LLM大模型书籍、640套大模型行业报告、LLM大模型学习视频、LLM大模型学习路线、开源大模型学习教程等, 😝有需要的小伙伴,可以 扫描下方二维码领取🆓↓↓↓

更多推荐
 已为社区贡献3条内容


所有评论(0)