丹摩征文活动||智谱AI零障碍使用攻略
CogVideoX简介 智谱AI开源视频生成模型CogVideoX,支持最长226个token的提示词,视频长度6秒,8帧/秒,分辨率720480。 核心为3D变分自编码器,压缩视频数据至原大小的2%,保持视频帧间连贯性,避免闪烁问题。 采用3D旋转位置编码(3DRoPE)
CogVideoX简介
智谱AI开源视频生成模型CogVideoX,支持最长226个token的提示词,视频长度6秒,8帧/秒,分辨率720480。
核心为3D变分自编码器,压缩视频数据至原大小的2%,保持视频帧间连贯性,避免闪烁问题。
采用3D旋转位置编码(3DRoPE)技术,捕捉时间维度上的帧间关系,建立长期依赖关系。
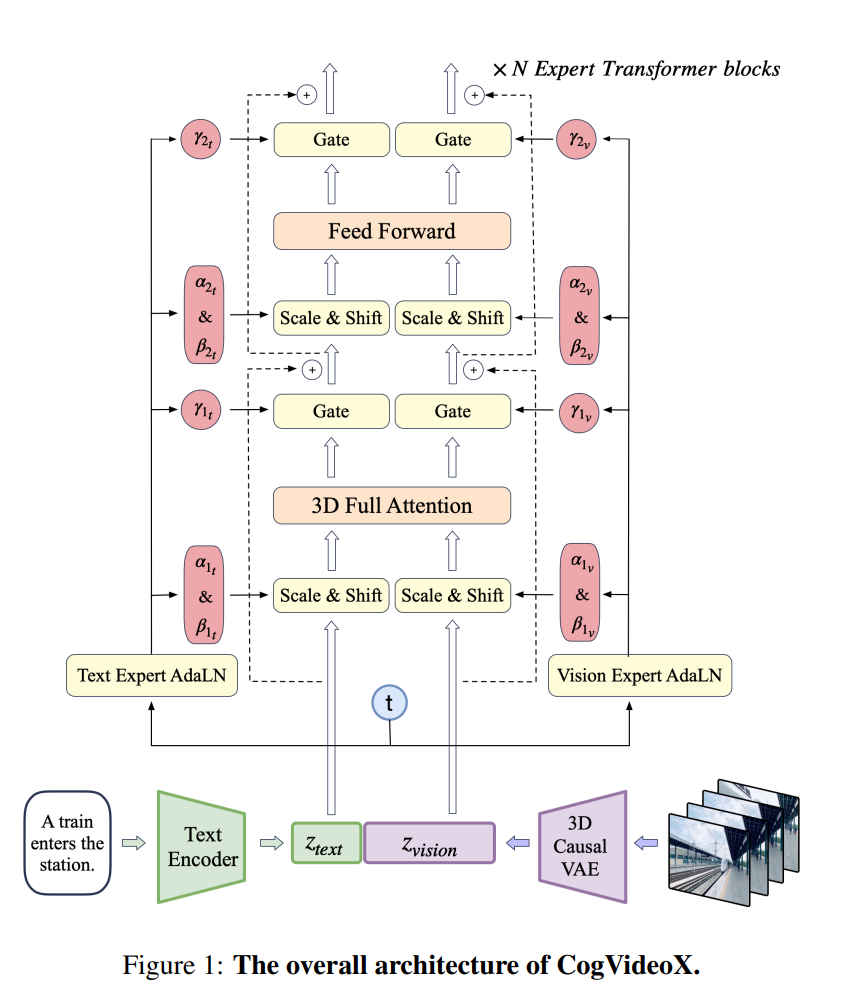
- 代码仓库:https://github.com/THUDM/CogVideo
- 模型下载:https://huggingface.co/THUDM/CogVideoX-2b
- 技术报告:https://github.com/THUDM/CogVideo/blob/main/resources/CogVideoX.pdf
部署实践流程
创建DAMODEL GPU云实例,选择L40S或4090显卡,100GB系统盘+50GB数据盘,PyTorch2.3.0、Ubuntu-22.04,CUDA12.1镜像。

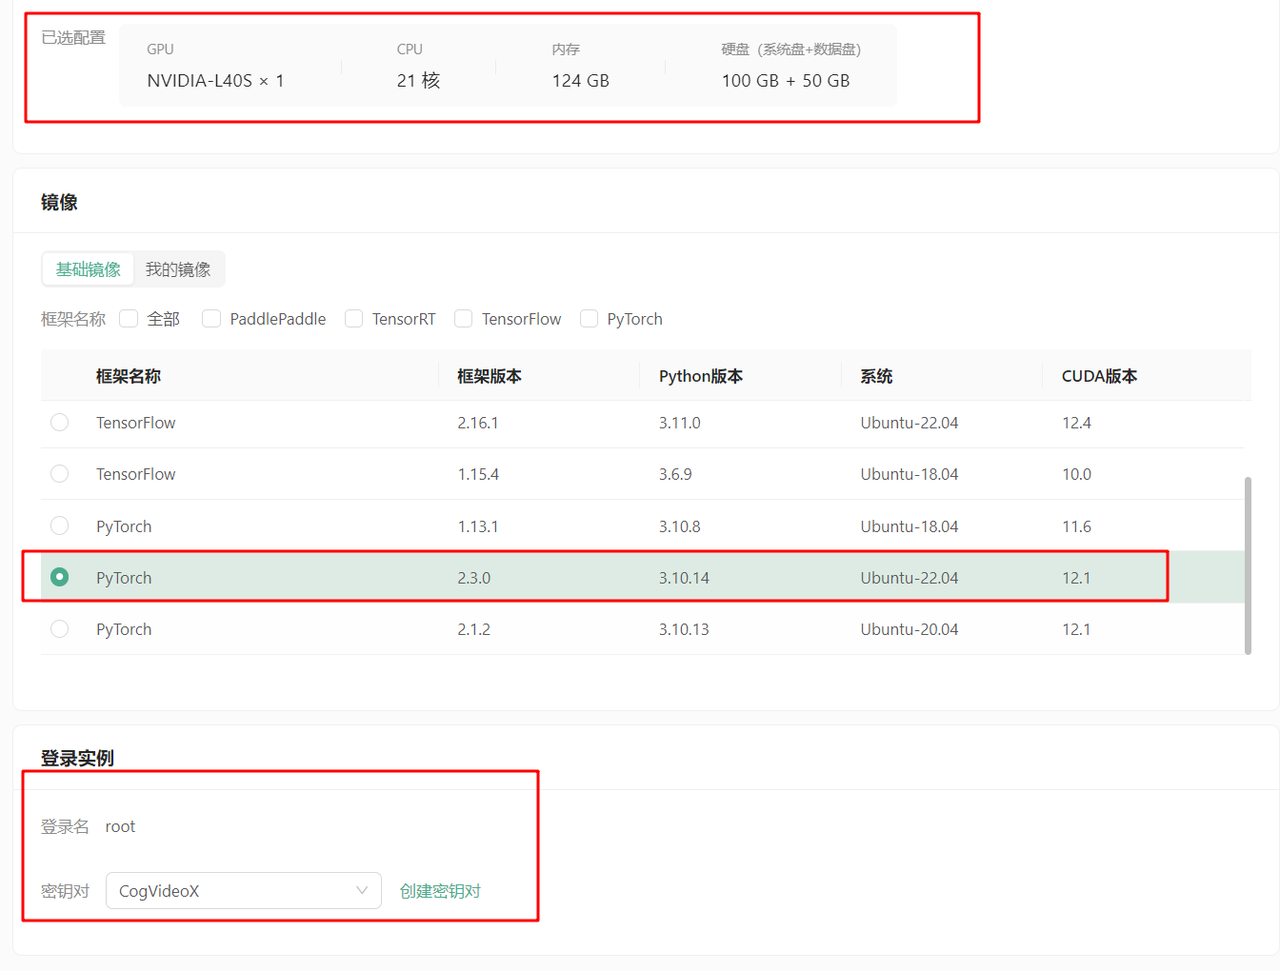
绑定密钥对并启动实例。
环境和依赖配置
拉取CogVideo代码仓库:`wget http://file.s3/damodel-openfile/CogVideox/CogVideo-main.tar`
解压缩并安装依赖:`tar -xf CogVideo-main.tar`和`pip install -r requirements.txt`
官方代码仓库为:https://github.com/THUDM/CogVideo.git
基于官方代码仓库的配置方法推荐您阅读:https://blog.csdn.net/air__Heaven/article/details/140967138
模型与配置文件
上传CogVideoX模型文件和配置文件,平台已预置模型,可通过内网高速下载。
官方模型仓库:https://huggingface.co/THUDM/CogVideoX-2b/tree/main
基于官方模型仓库的配置方法推荐您阅读:https://blog.csdn.net/air__Heaven/article/details/140967138
开始运行
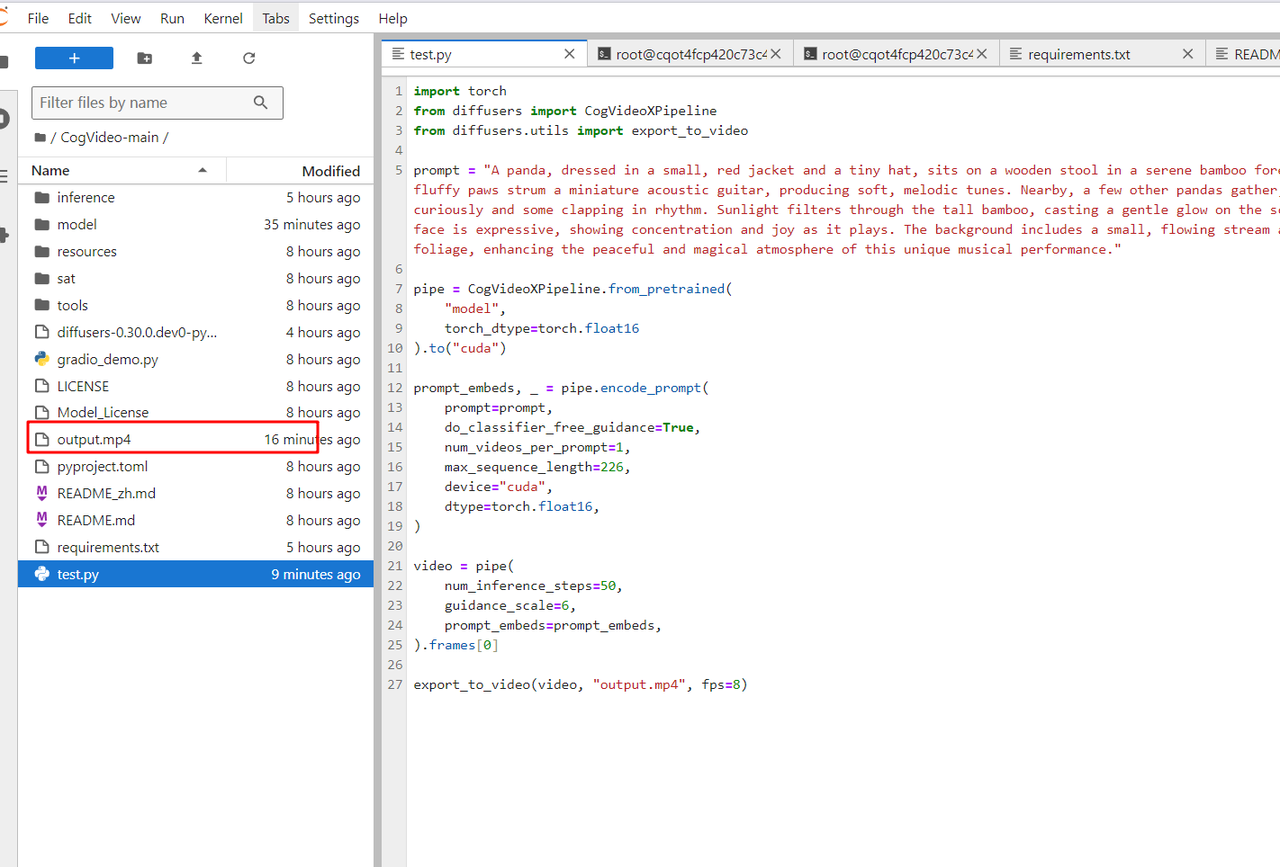
进入CogVideo-main文件夹,运行`test.py`文件,使用diffusers库中的CogVideoXPipeline模型生成视频。
import torch
from diffusers import CogVideoXPipeline
from diffusers.utils import export_to_video

# prompt里写自定义想要生成的视频内容
prompt = "A panda, dressed in a small, red jacket and a tiny hat, sits on a wooden stool in a serene bamboo forest. The panda's fluffy paws strum a miniature acoustic guitar, producing soft, melodic tunes. Nearby, a few other pandas gather, watching curiously and some clapping in rhythm. Sunlight filters through the tall bamboo, casting a gentle glow on the scene. The panda's face is expressive, showing concentration and joy as it plays. The background includes a small, flowing stream and vibrant green foliage, enhancing the peaceful and magical atmosphere of this unique musical performance."

pipe = CogVideoXPipeline.from_pretrained(
    "/root/workspace/CogVideoX-2b", # 这里填CogVideo模型存放的位置,此处是放在了数据盘中
    torch_dtype=torch.float16
).to("cuda")

# 参数do_classifier_free_guidance设置为True可以启用无分类器指导,增强生成内容一致性和多样性
# num_videos_per_prompt控制每个prompt想要生成的视频数量
# max_sequence_length控制输入序列的最大长度
prompt_embeds, _ = pipe.encode_prompt(
    prompt=prompt,
    do_classifier_free_guidance=True,
    num_videos_per_prompt=1,
    max_sequence_length=226,
    device="cuda",
    dtype=torch.float16,
)

video = pipe(
    num_inference_steps=50,
    guidance_scale=6,
    prompt_embeds=prompt_embeds,
).frames[0]

export_to_video(video, "output.mp4", fps=8)
运行成功后,可以在当前文件夹中找到对应 prompt 生成的 output.mp4 视频:
Web UI Demo
运行`gradio_demo.py`文件,访问本地url`http://0.0.0.0:7870`。
通过DAMODEL平台的端口映射能力,将7870端口映射到公网,访问gradio页面。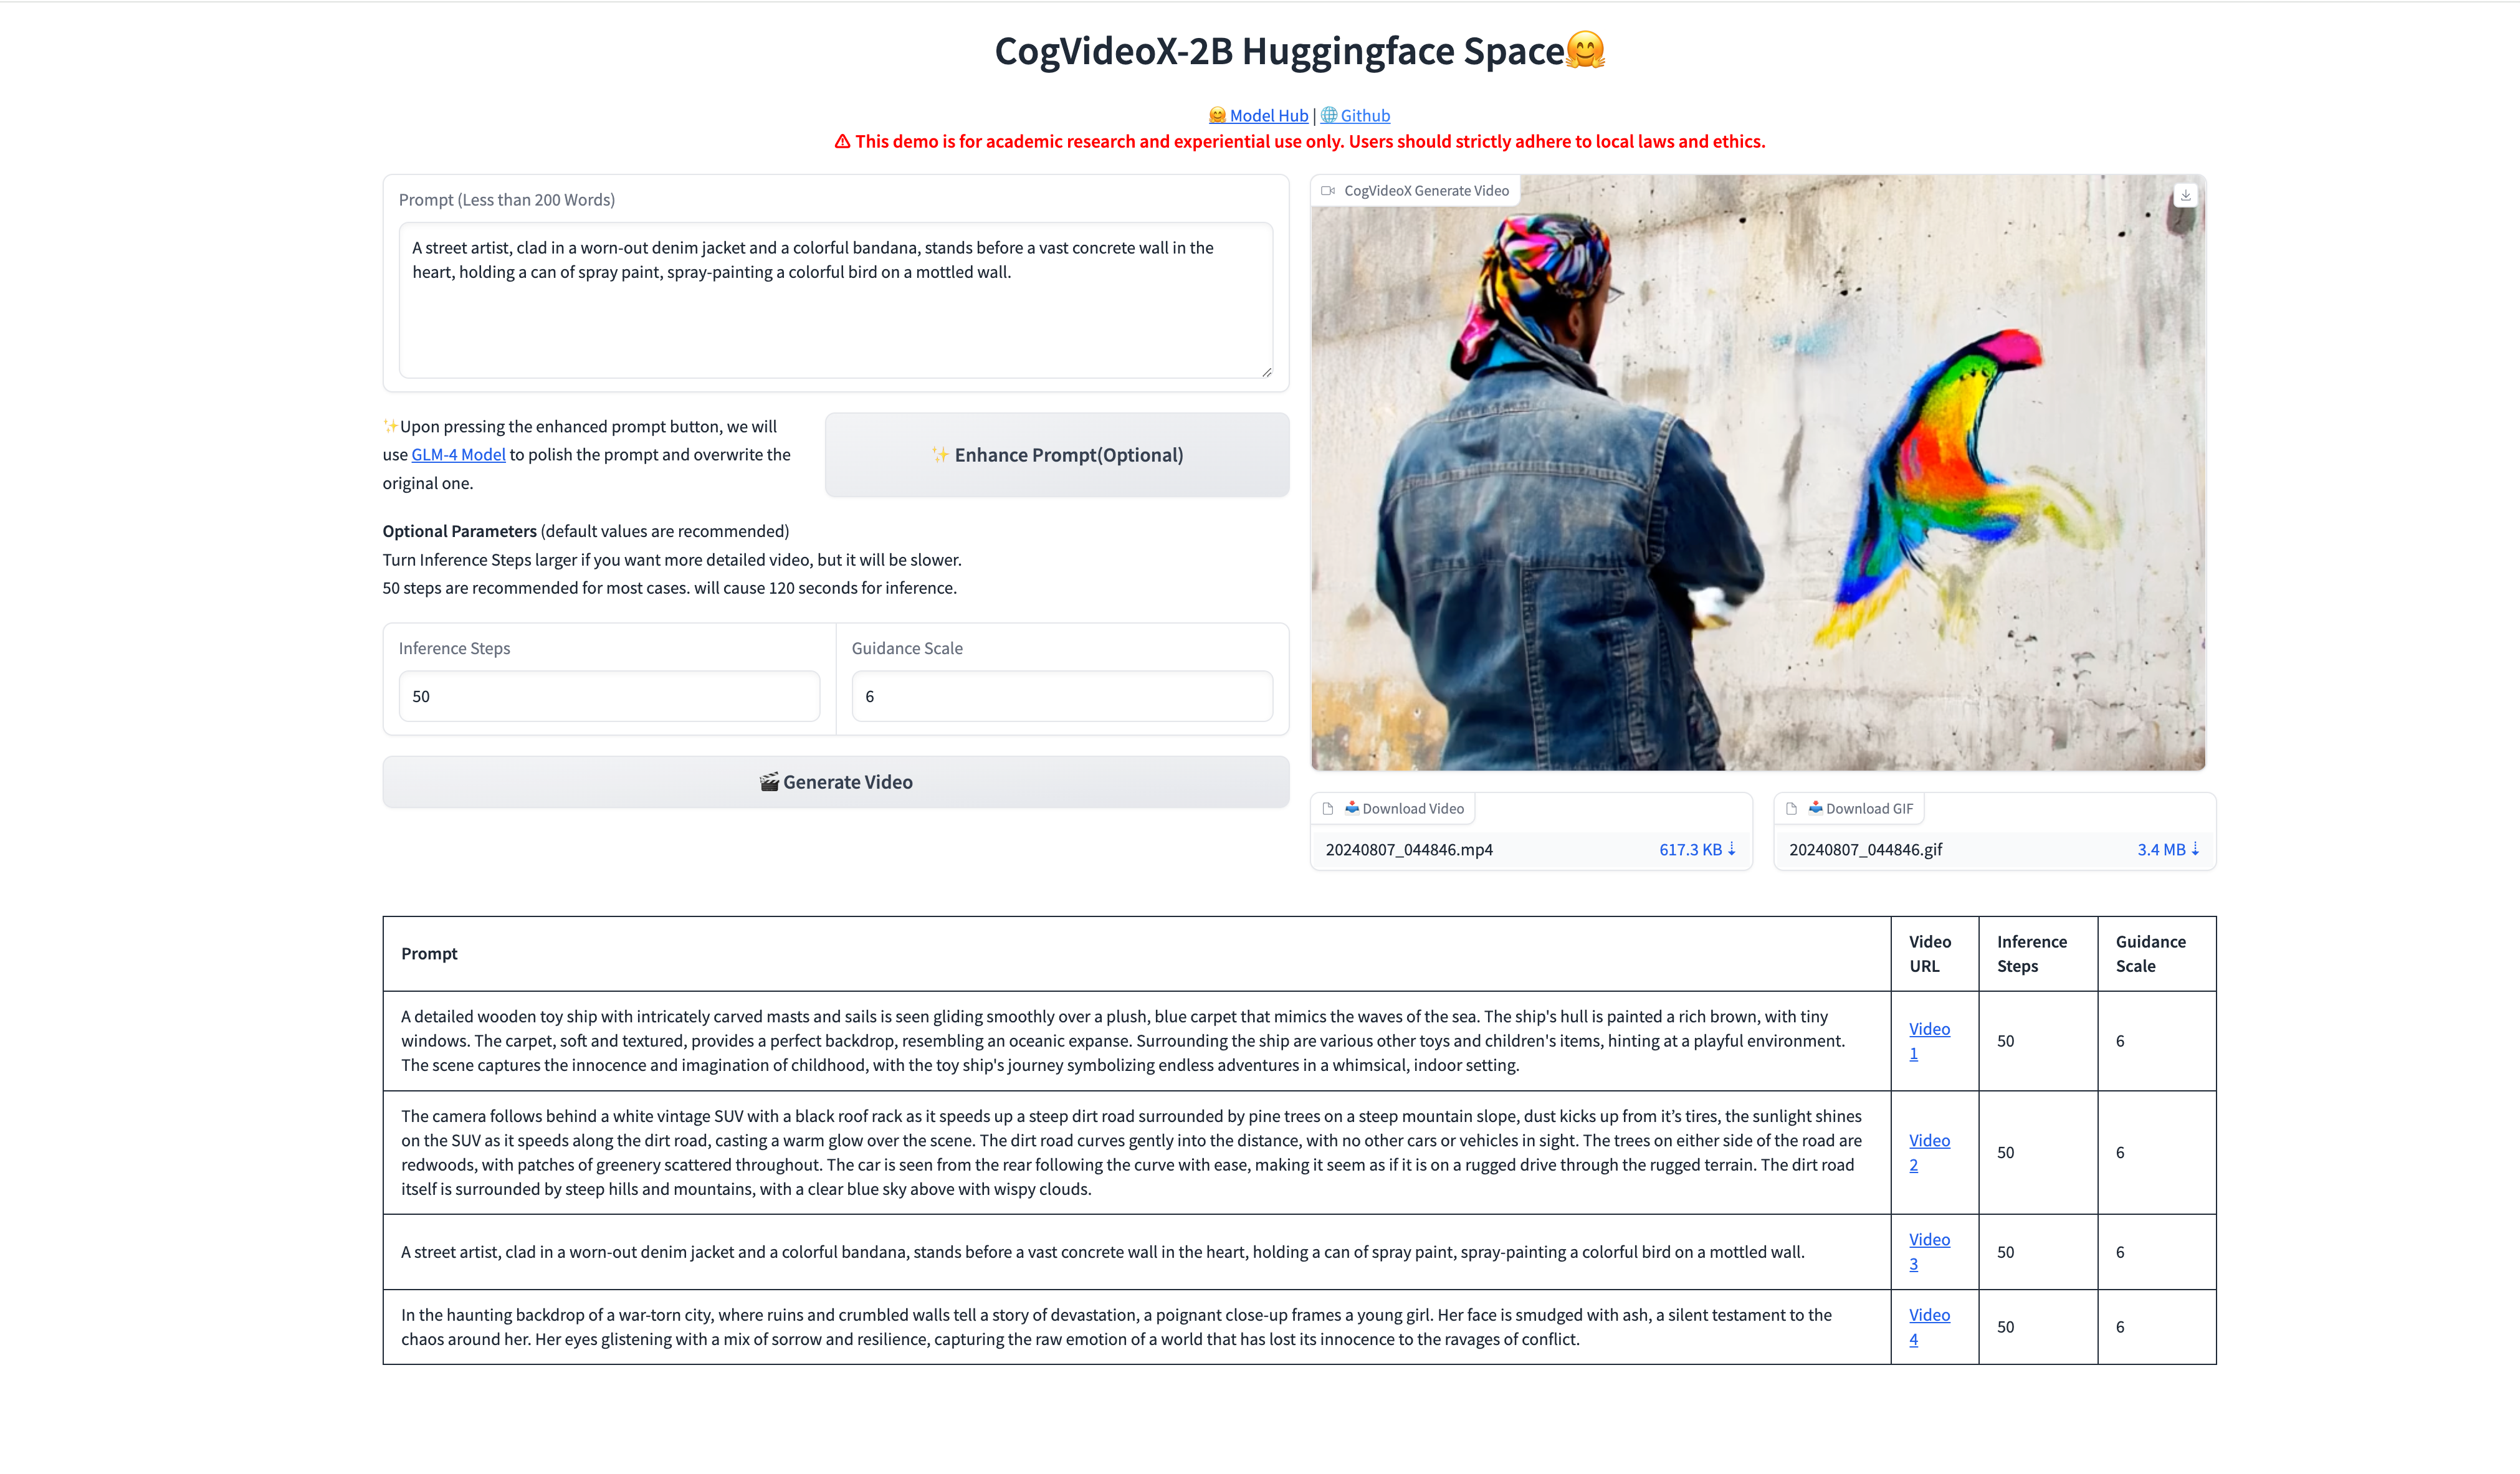
FLUX.1简介
FLUX.1由黑森林实验室(BlackForestLabs)开发,分为三个版本:
闭源FLUX.1-pro:最顶级性能,提供先进图像生成能力。
开源不可商用FLUX.1-dev:从FLUX.1-pro提炼,保持类似质量和提示词能力,更高效。
开源可商用FLUX.1-schnell:为本地开发和个人使用设计,Apache2.0许可,生成速度快,内存占用小。
FLUX.1性能:训练参数达到120亿,超过SD3Medium的20亿参数。
在图像质量、提示词准确跟随、尺寸适应性、排版和输出多样性方面超越Midjourneyv6.0、DALL·E3(HD)和SD3-Ultra等模型。
部署流程
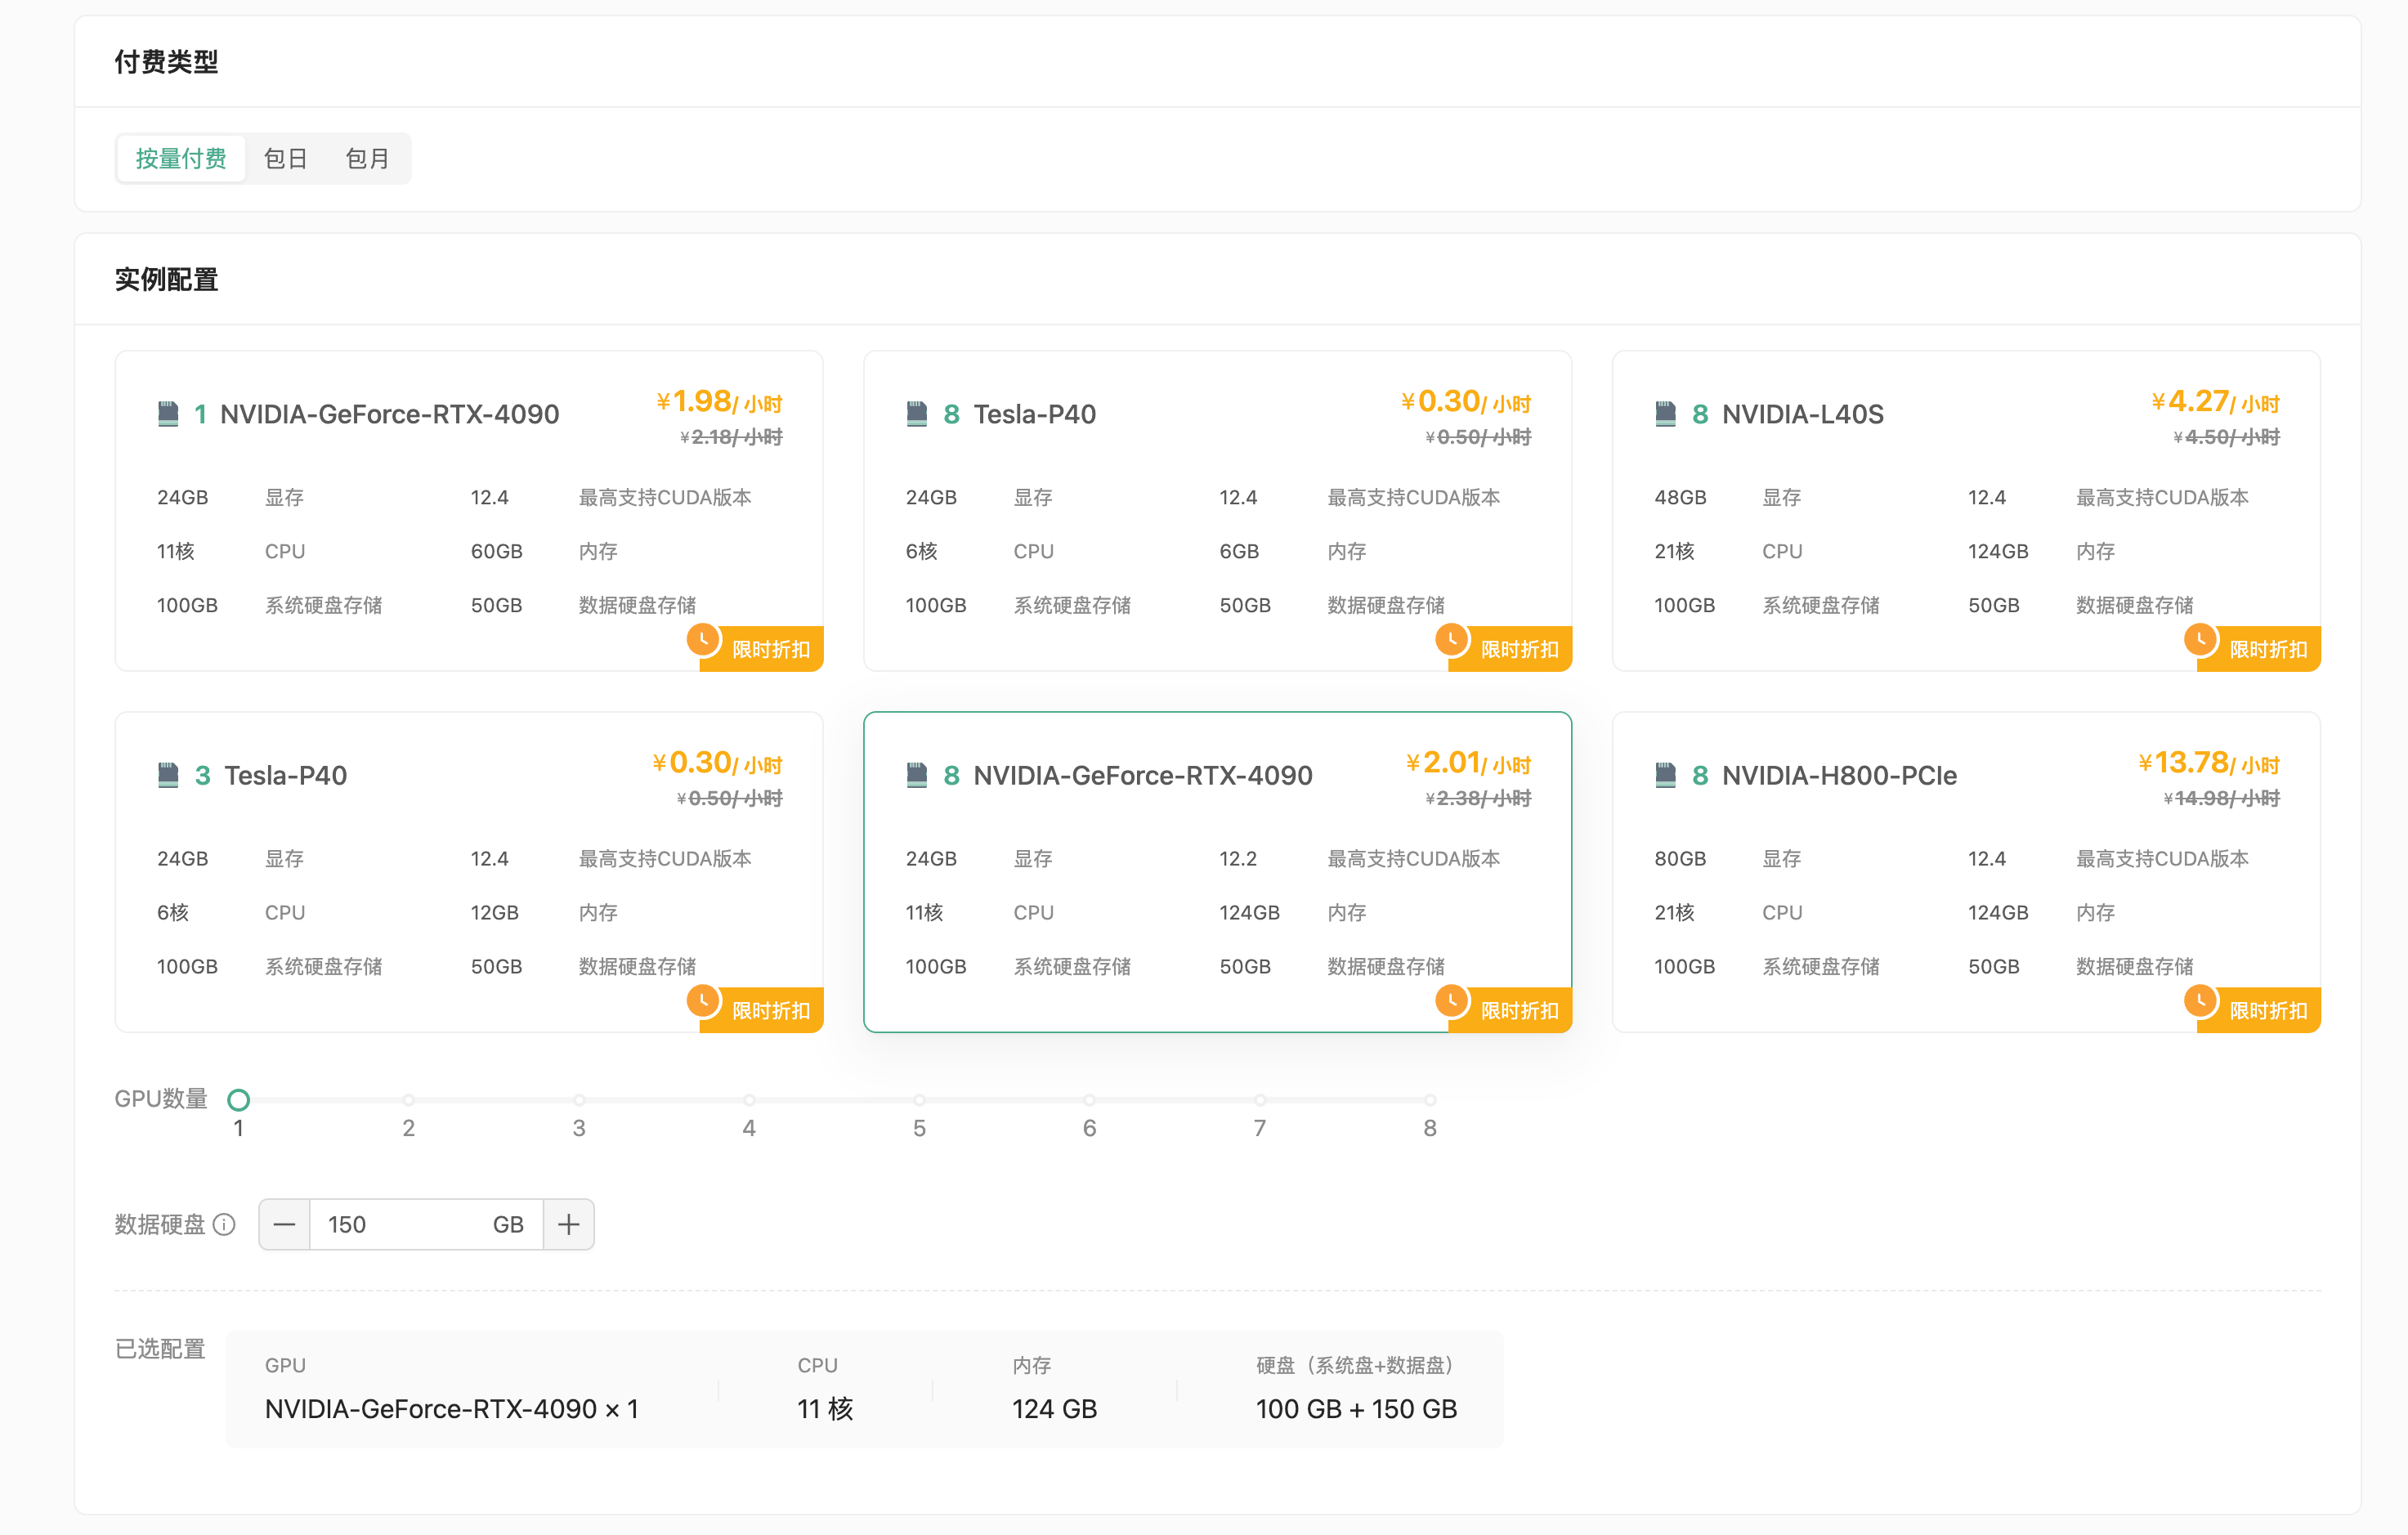
• 创建GPU云实例,选择付费类型(按量付费或包月),GPU型号(推荐NVIDIA GeForce RTX-4090),配置数据硬盘(建议扩容至150GB)。
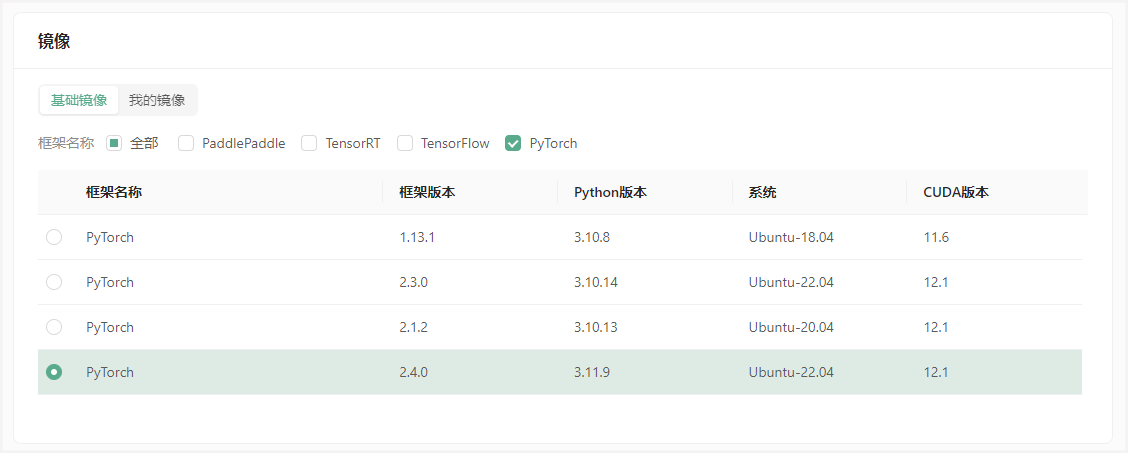
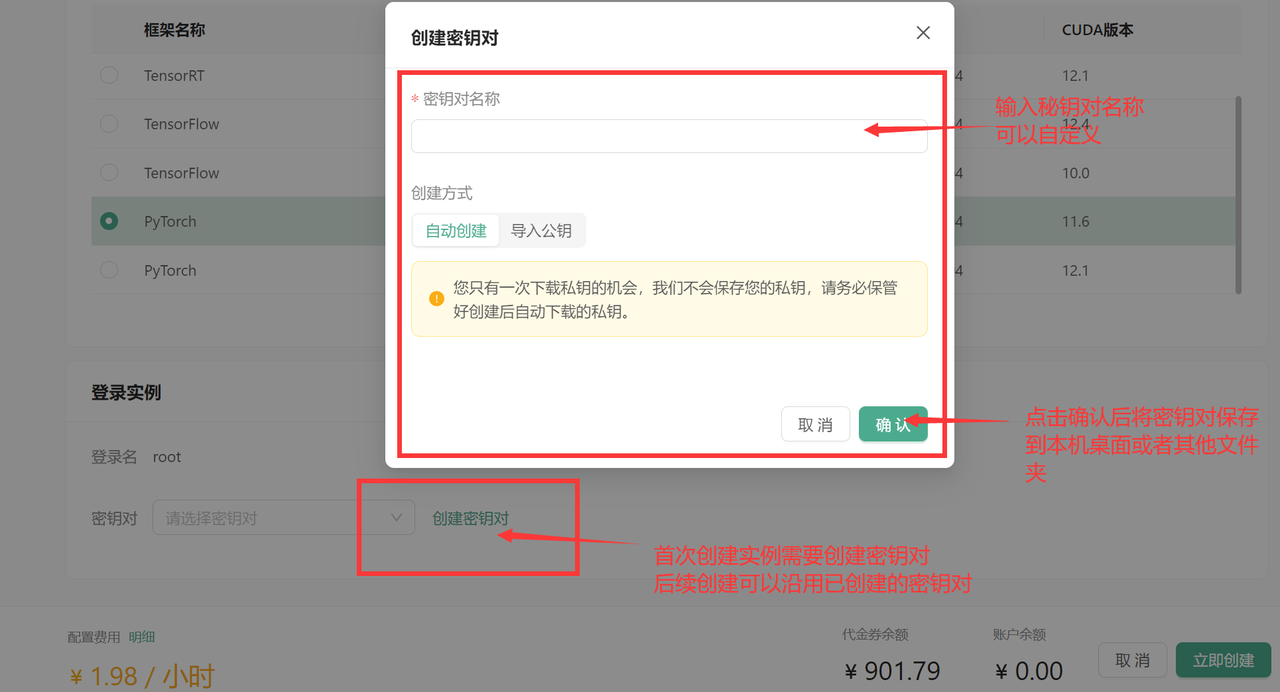
选择PyTorch2.4.0镜像,创建并绑定密钥对,启动实例。

登录实例
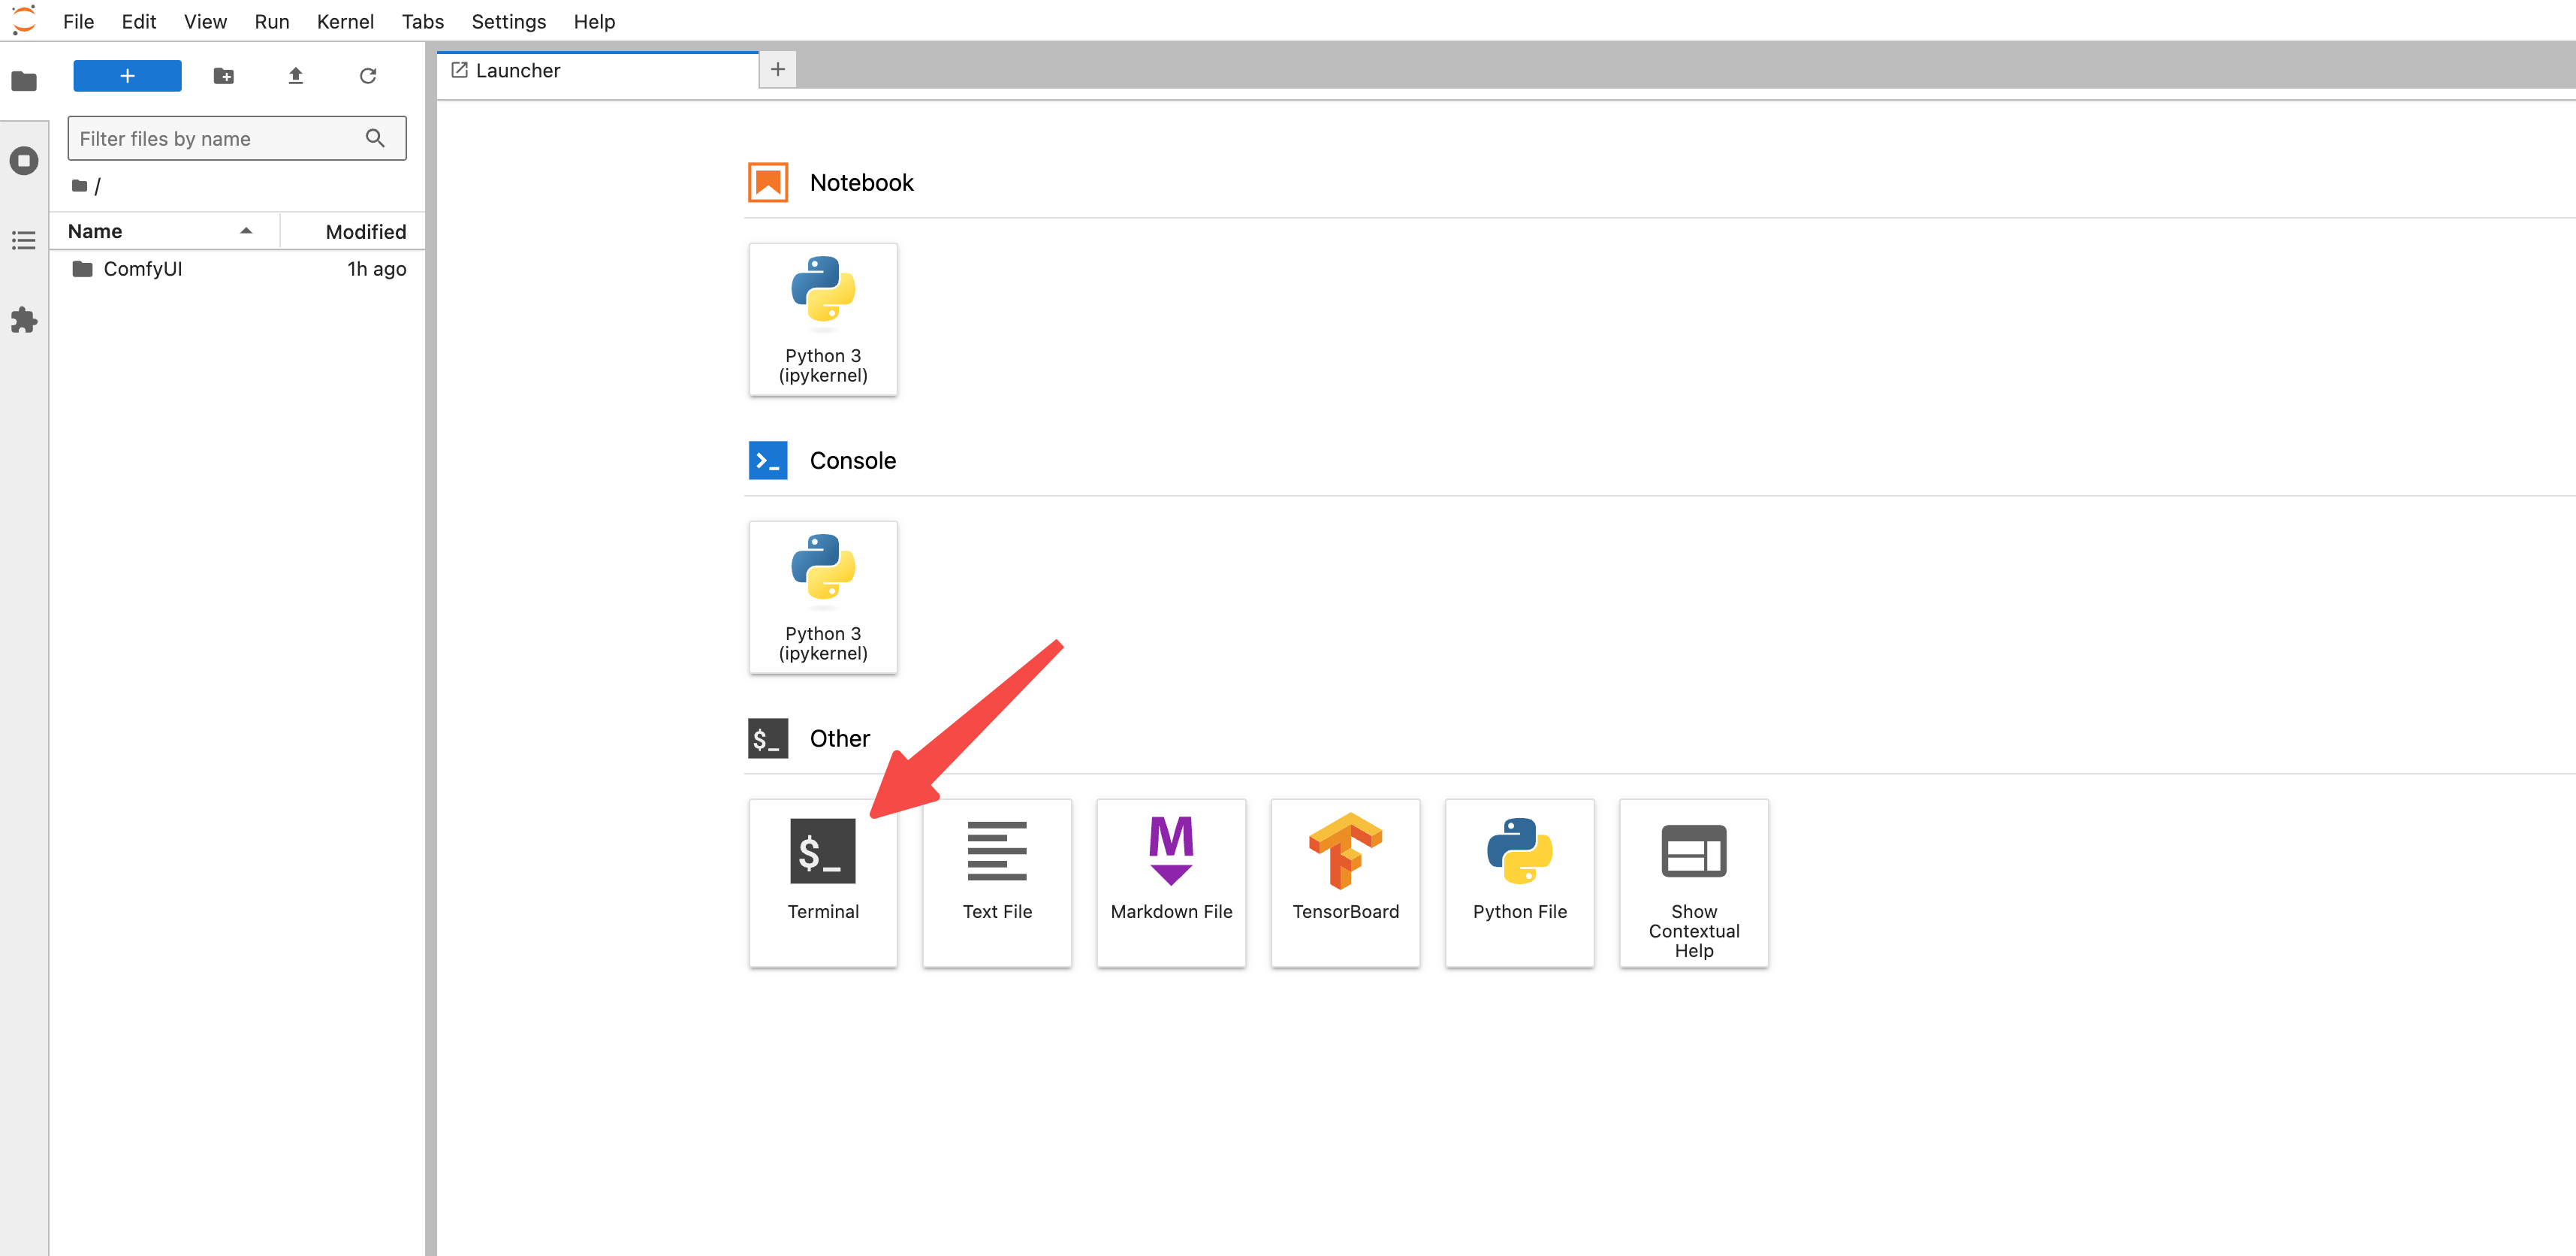
接下来将基于平台提供的JupyterLab工具,演示fp16版本的部署流程。
首先,启动JupyterLab,并创建终端:
部署ComfyUI
克隆ComfyUI代码仓库。
# github官方代码仓库
git clone https://github.com/comfyanonymous/ComfyUI.git
# gitCode-github加速计划代码仓库
git clone https://gitcode.com/gh_mirrors/co/ComfyUI.git
克隆完成后可看到如下目录:
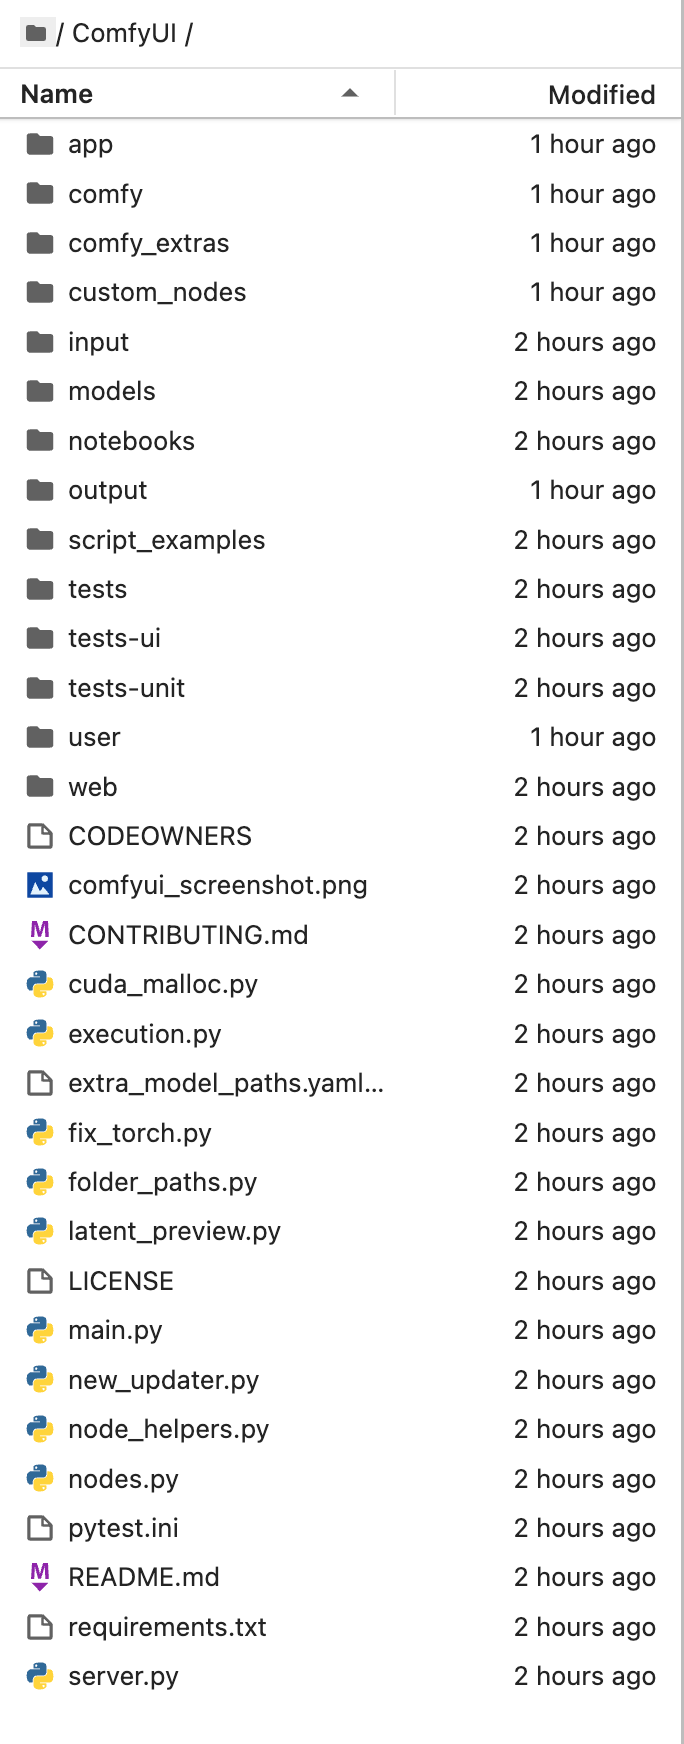
终端进入/root/workspace/ComfyUI目录,执行以下命令,安装ComfyUI需要的依赖:`pip install -r requirements.txt --ignore-installed`。
cd ComfyUI/
pip install -r requirements.txt --ignore-installed
启动ComfyUI:`python main.py--listen`。

看到服务成功启动,说明ComfyUI部署成功!
提示
您如果遇到报错
ImportError: version conflict: '/opt/conda/lib/python3.11/site-packages/psutil/_psutil_linux.cpython-311-x86_64-linux-gnu.so' C extension module was built for another version of psutil (5.9.0 instead of 6.0.0); you may try to 'pip uninstall psutil', manually remove /opt/conda/lib/python3.11/site-packages/psutil/_psutil_linux.cpython-311-x86_64-linux-gnu.so or clean the virtual env somehow, then reinstall可先卸载冲突包,再次安装依赖
pip uninstall psutil
pip install -r requirements.txt --ignore-installed
部署FLUX.1
推荐您阅读ComfyUI官方使用FLUX.1示例,以下是基于丹摩平台的部署教程
• 下载FLUX.1-dev和FLUX.1-schnell模型,以及Clip模型。
# 下载完整FLUX.1-dev模型
wget http://file.s3/damodel-openfile/FLUX.1/FLUX.1-dev.tar
# 下载完整FLUX.1-schnell模型
wget http://file.s3/damodel-openfile/FLUX.1/FLUX.1-dev.tar
# 下载完整Clip模型
wget http://file.s3/damodel-openfile/FLUX.1/flux_text_encoders.tar
• 解压并移动模型文件至ComfyUI指定目录。
# 进入解压后的文件夹
cd /root/workspace/flux_text_encoders
# 移动文件
mv clip_l.safetensors /root/workspace/ComfyUI/models/clip/
mv t5xxl_fp16.safetensors /root/workspace/ComfyUI/models/clip/
使用流程
启动ComfyUI:`cd /root/workspace/ComfyUI & python main.py--listen`。
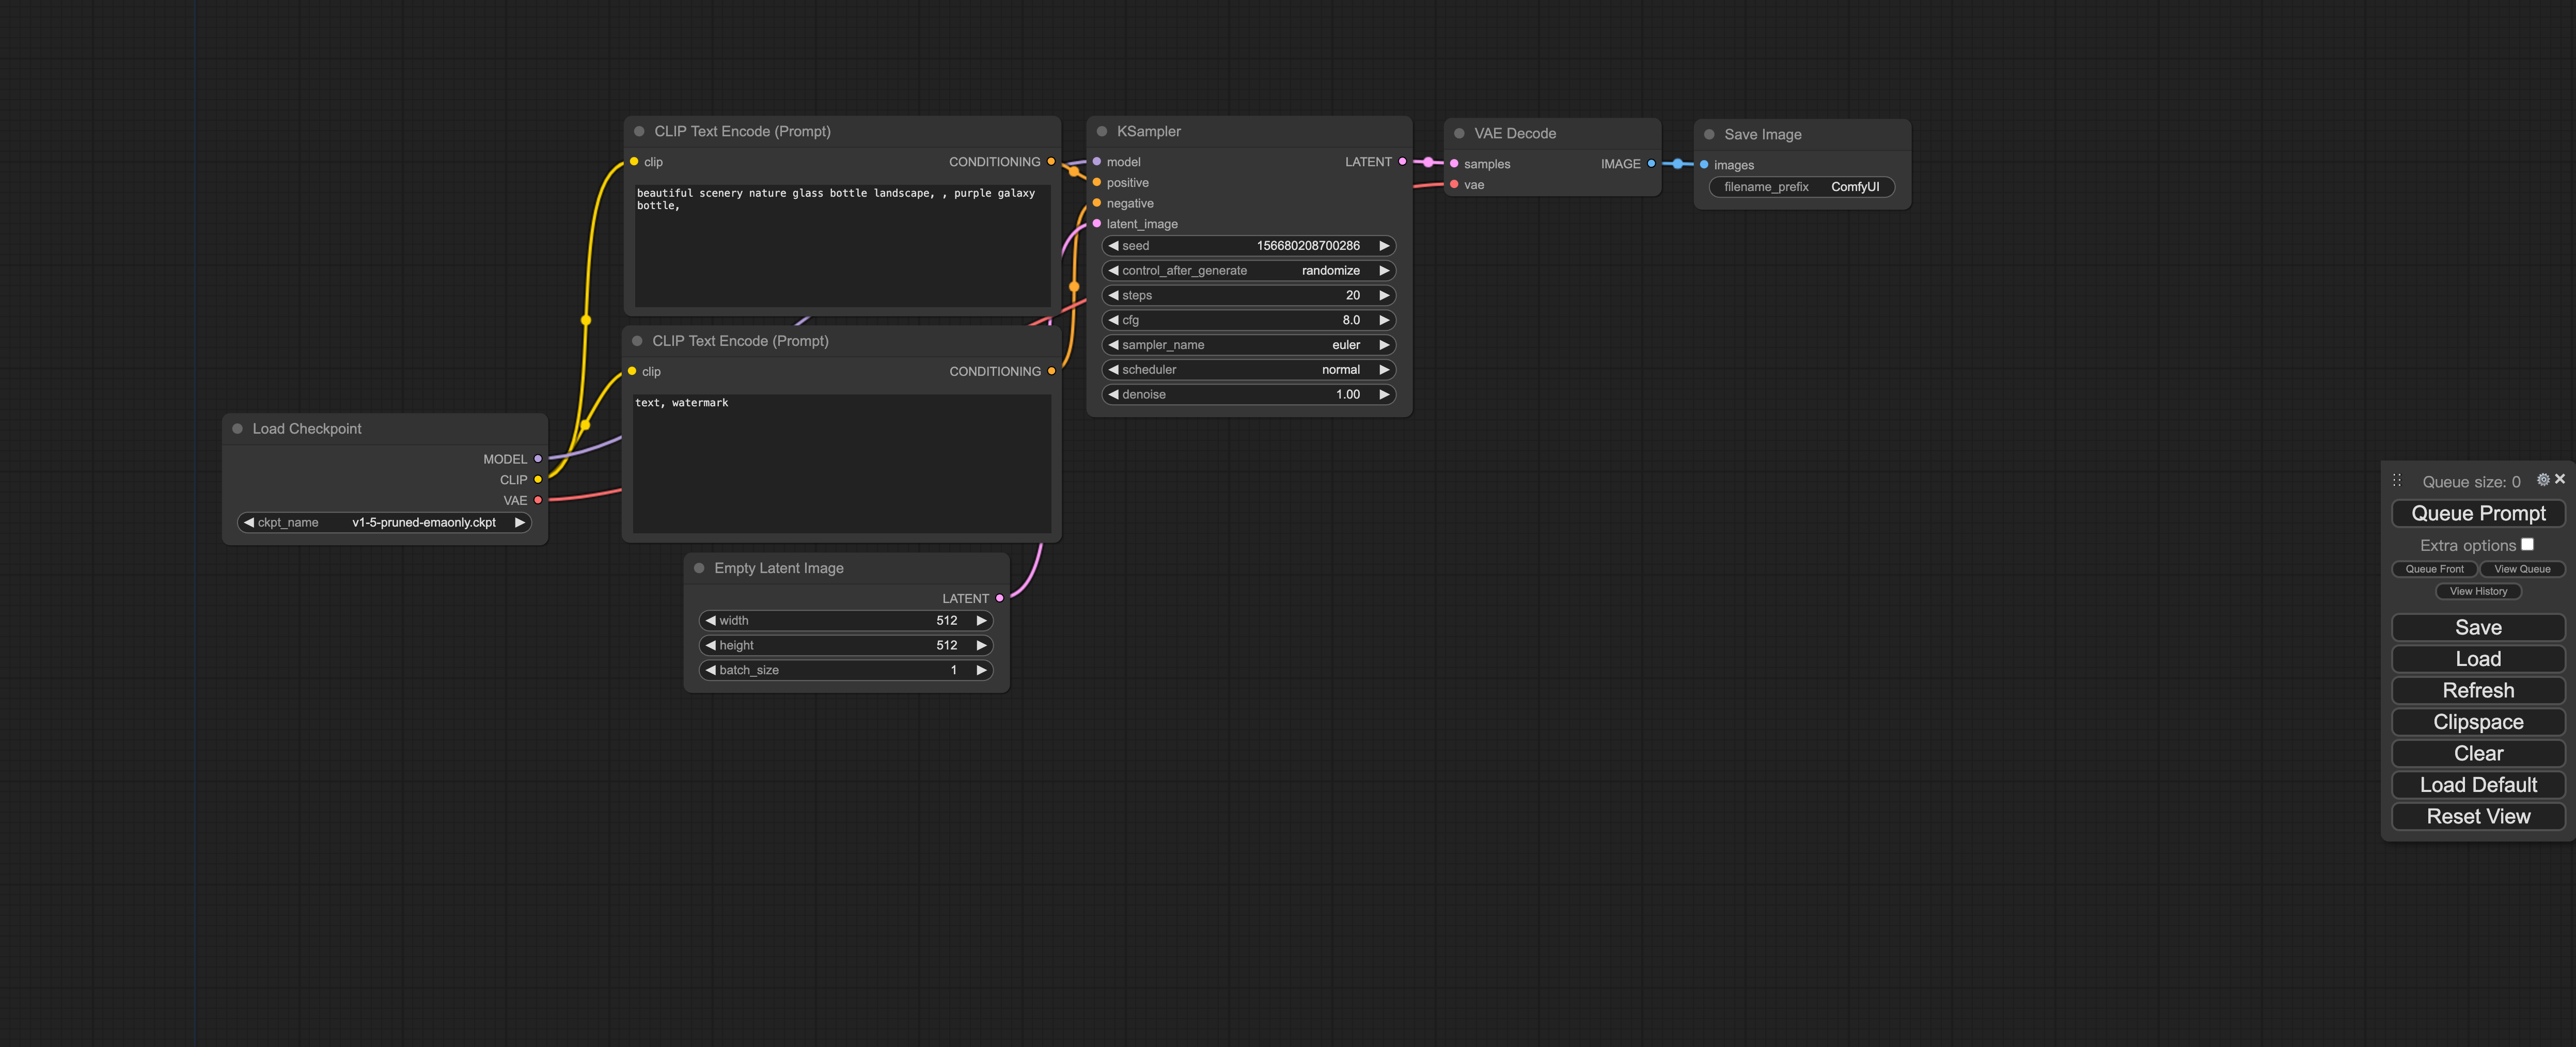
启动成功,host为0.0.0.0,端口为8188


通过丹摩平台端口映射能力,将内网端口映射到公网,访问ComfyUI交互界面。
展示效果:FLUX.1-dev-FP16、FLUX.1-schnell-FP16、FLUX.1-dev-FP8和FLUX.1-schnell-FP8的展示效果和防压缩图片链接。
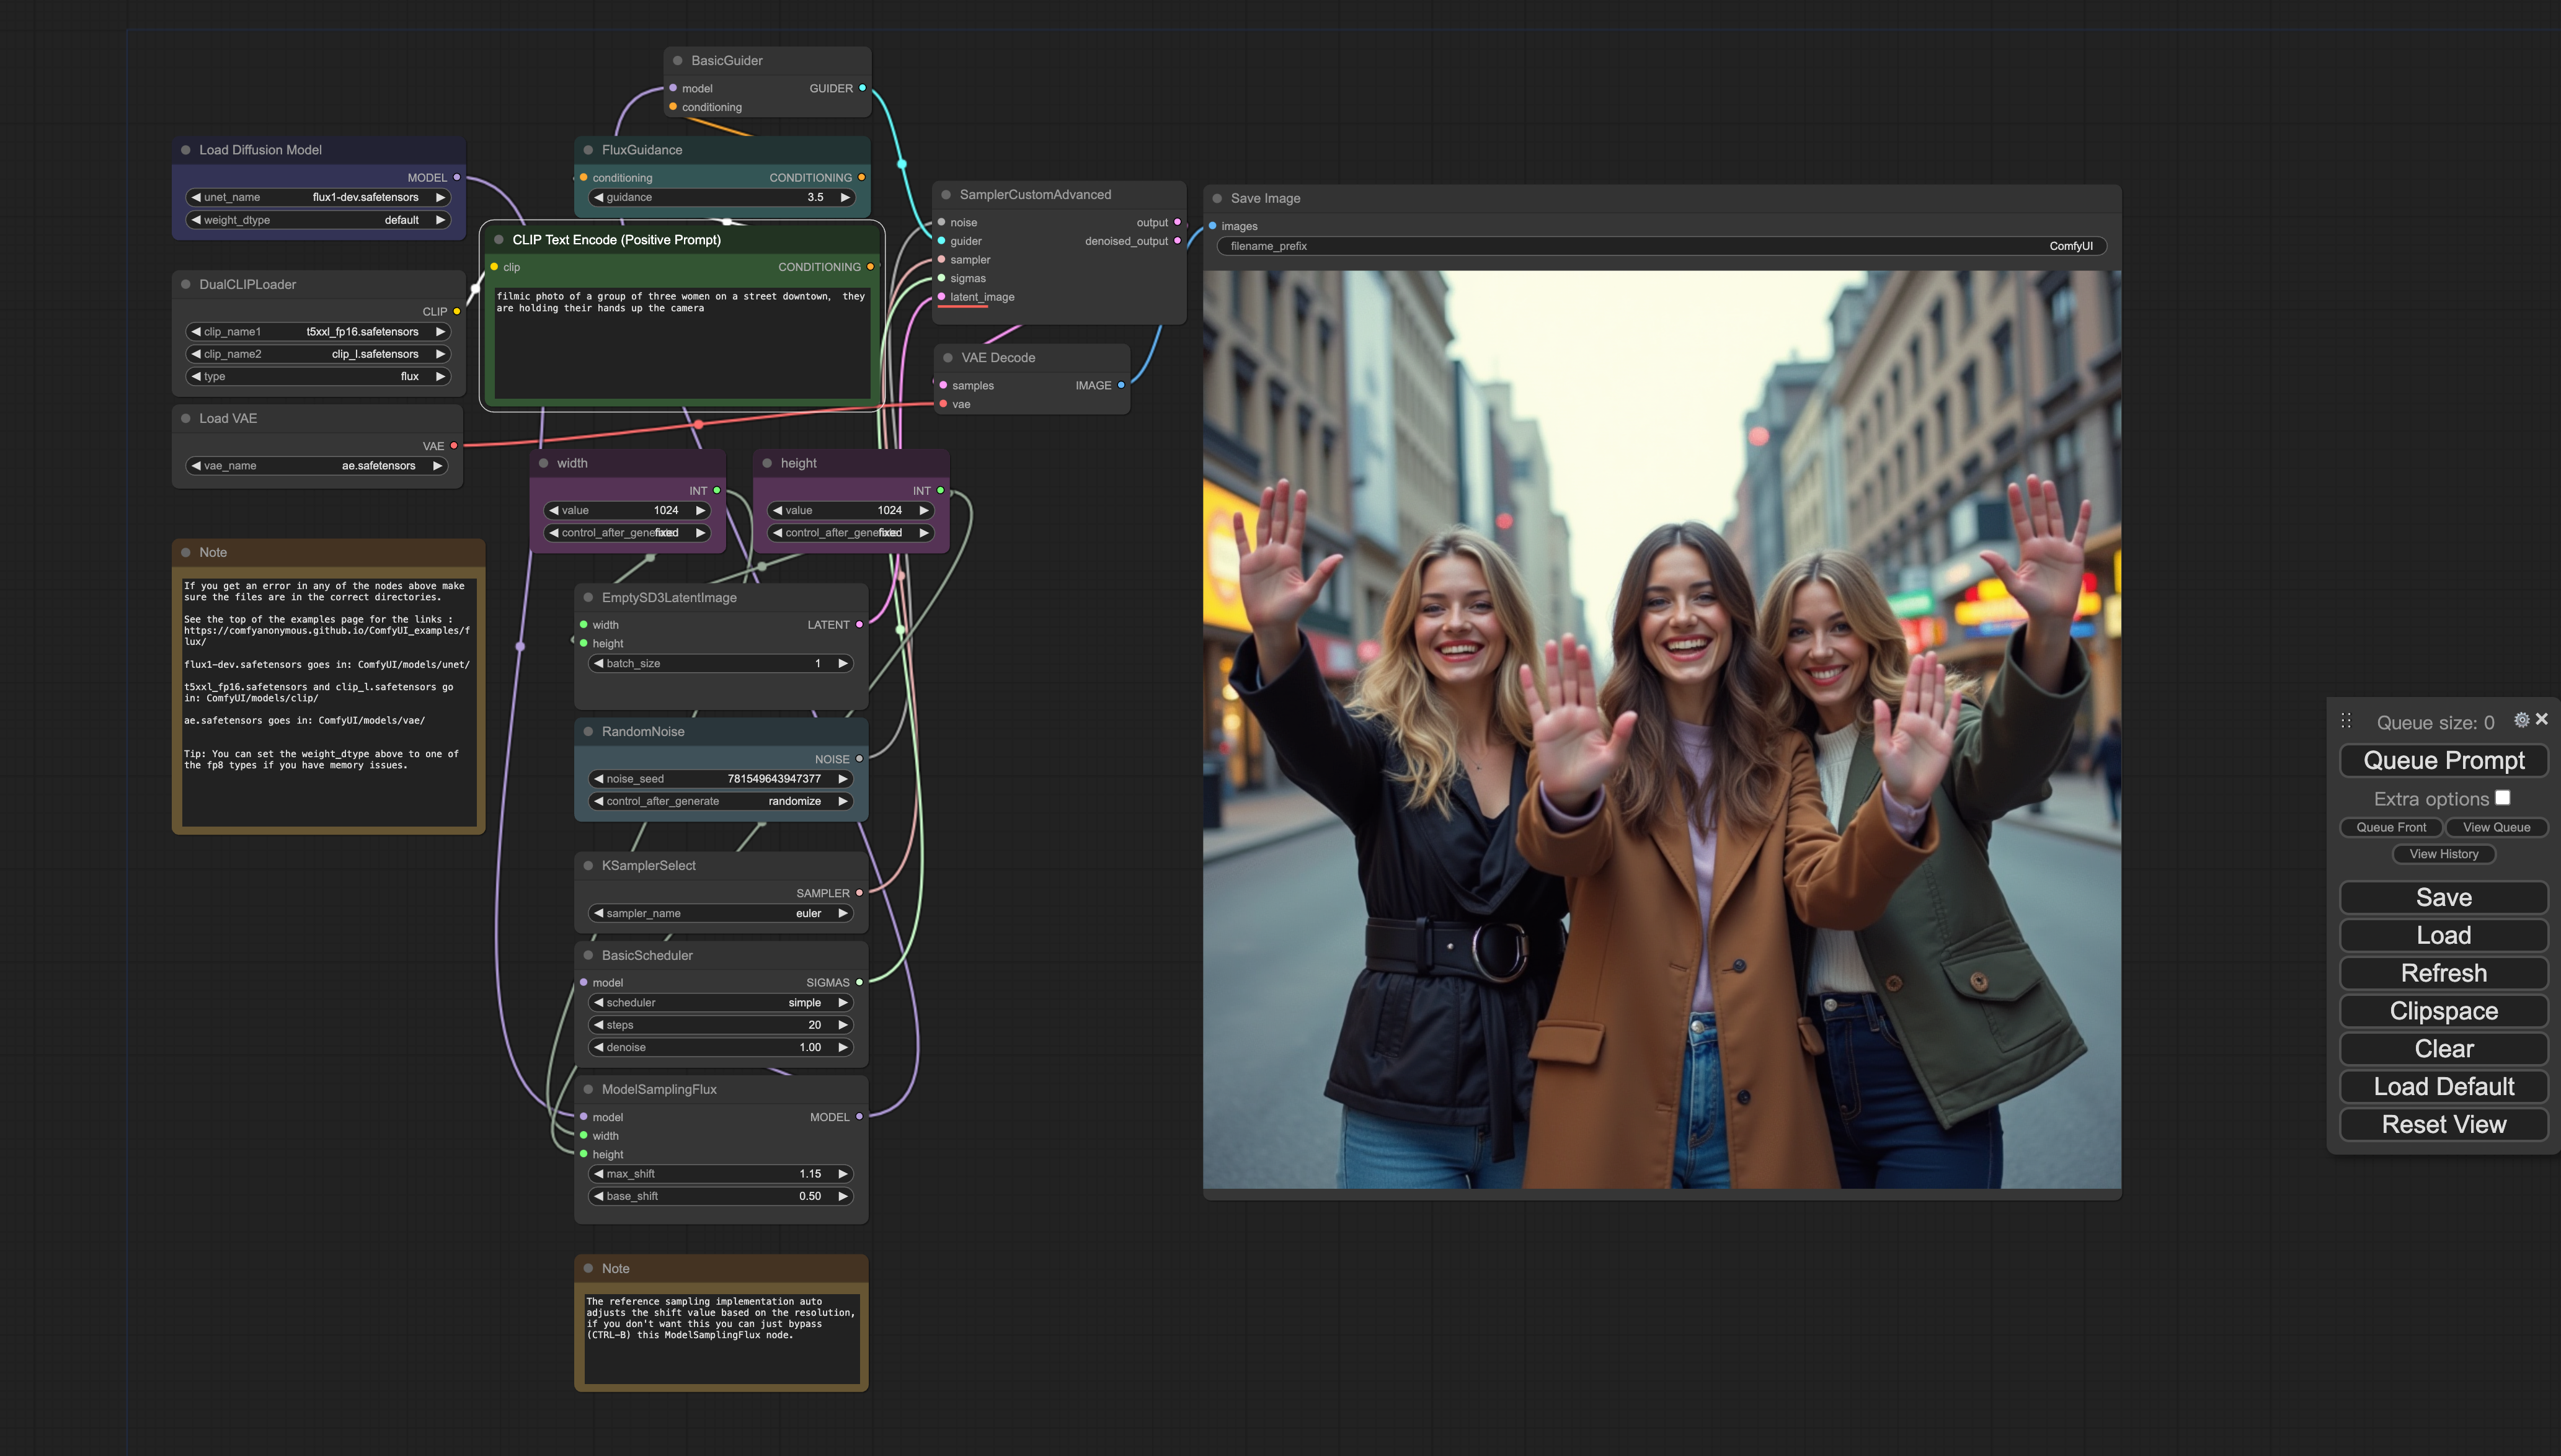
FLUX.1-dev-FP16

FLUX.1-schnell-FP16

FLUX.1-dev-FP8

FLUX.1-schnell-FP8

防压缩图片链接
Llama3.1
大模型(LLM)定义:指基于深度学习算法训练的自然语言处理(NLP)模型,应用于自然语言理解和生成等领域。
Llama3.1介绍
Meta于2024年7月23日宣布推出Llama3.1,包括405B、705B和8B版本。
Llama3.1405B支持上下文长度为128KTokens,基于15万亿个Tokens、超1.6万个H100 GPU进行训练。
Llama3.1性能对比
Llama3.1与其他模型在多个基准测试中的性能对比数据。
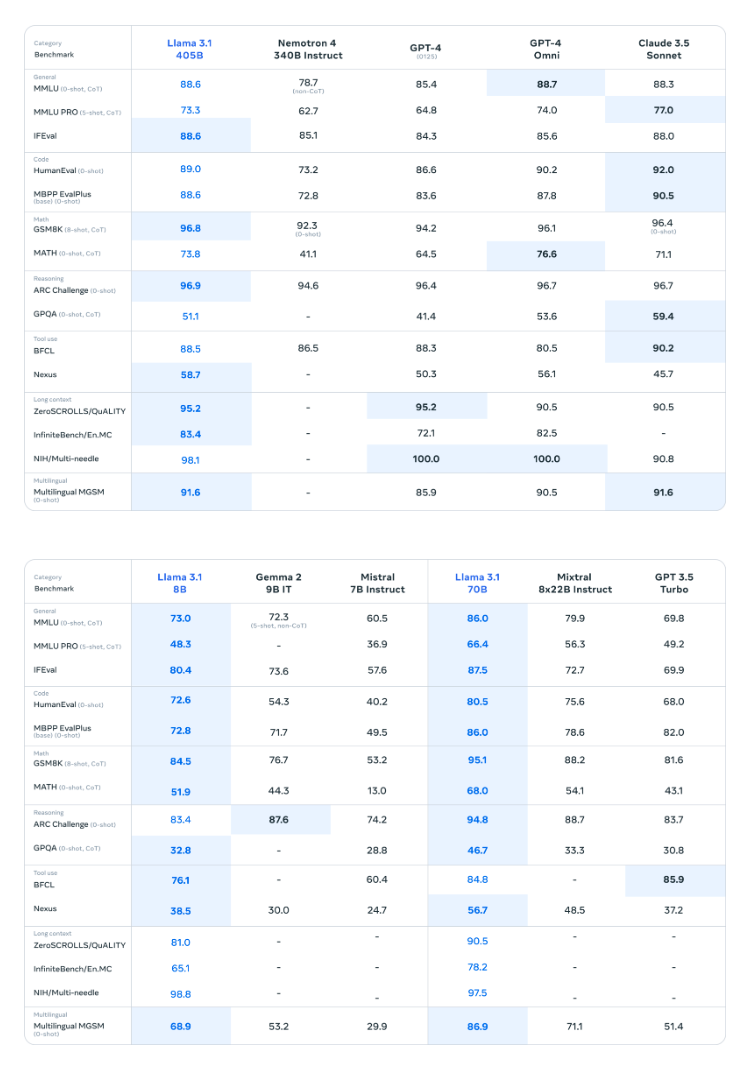
由于资源限制,我们此次选择部署 Llama3.1 的 8B 版本,该版本至少需要GPU显存16G。
测试环境:
ubuntu 22.04 python 3.12 cuda 12.1 pytorch 2.4.0
部署流程
• 创建GPU云实例,选择付费类型(按量付费或包月),GPU型号(推荐NVIDIA GeForce RTX-4090),配置数据硬盘大小(默认50GB,如果您通过官方预制方式下载模型,建议扩容至60GB)。
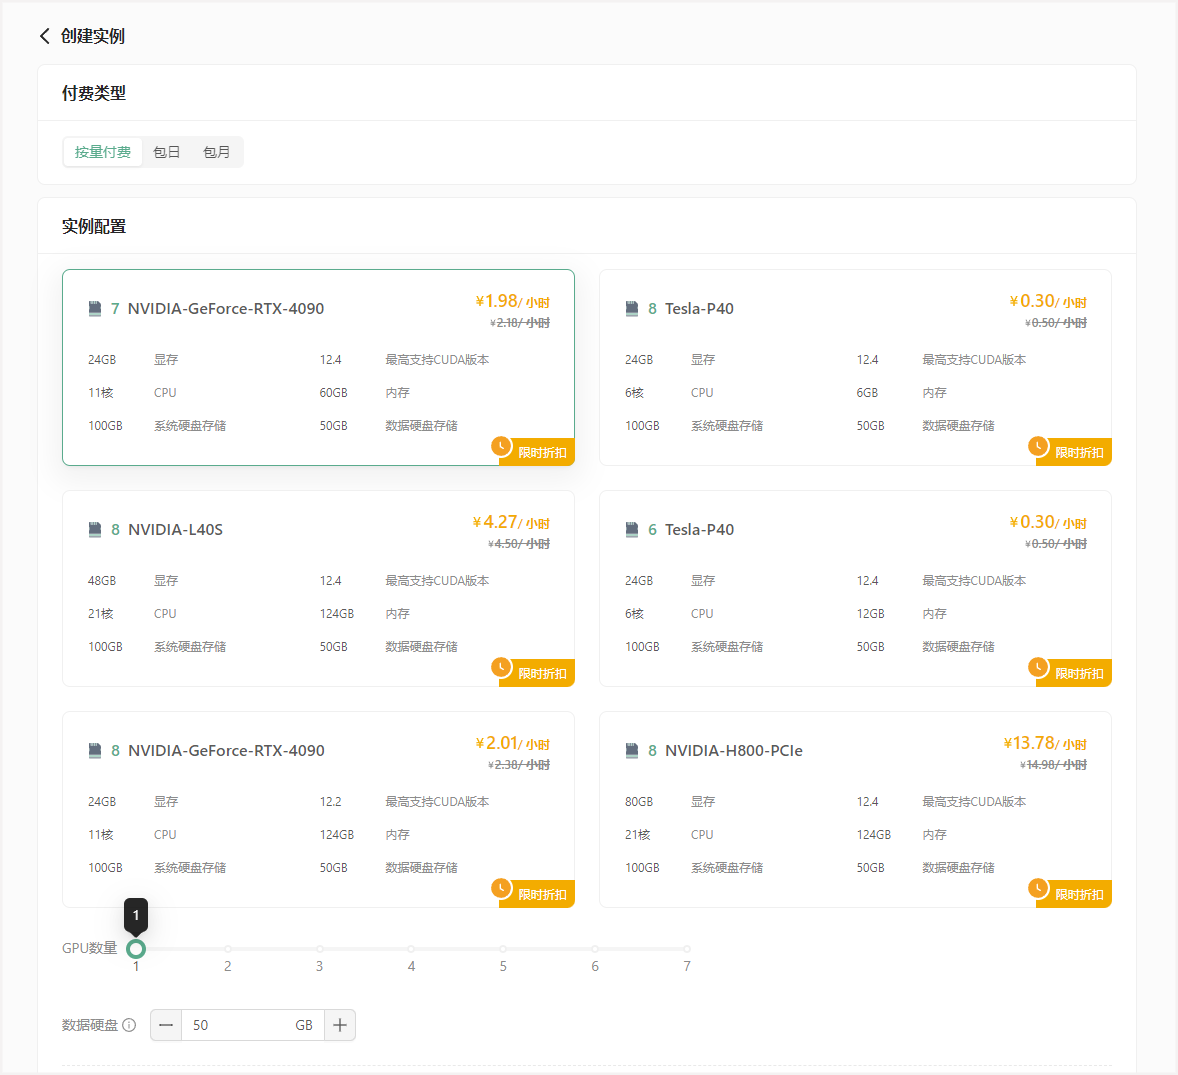
选择PyTorch2.4.0镜像,创建密钥对,并启动实例。

登录实例
• 通过JupyterLab或SSH登录实例,使用root用户和私钥进行登录。
JupyterLab

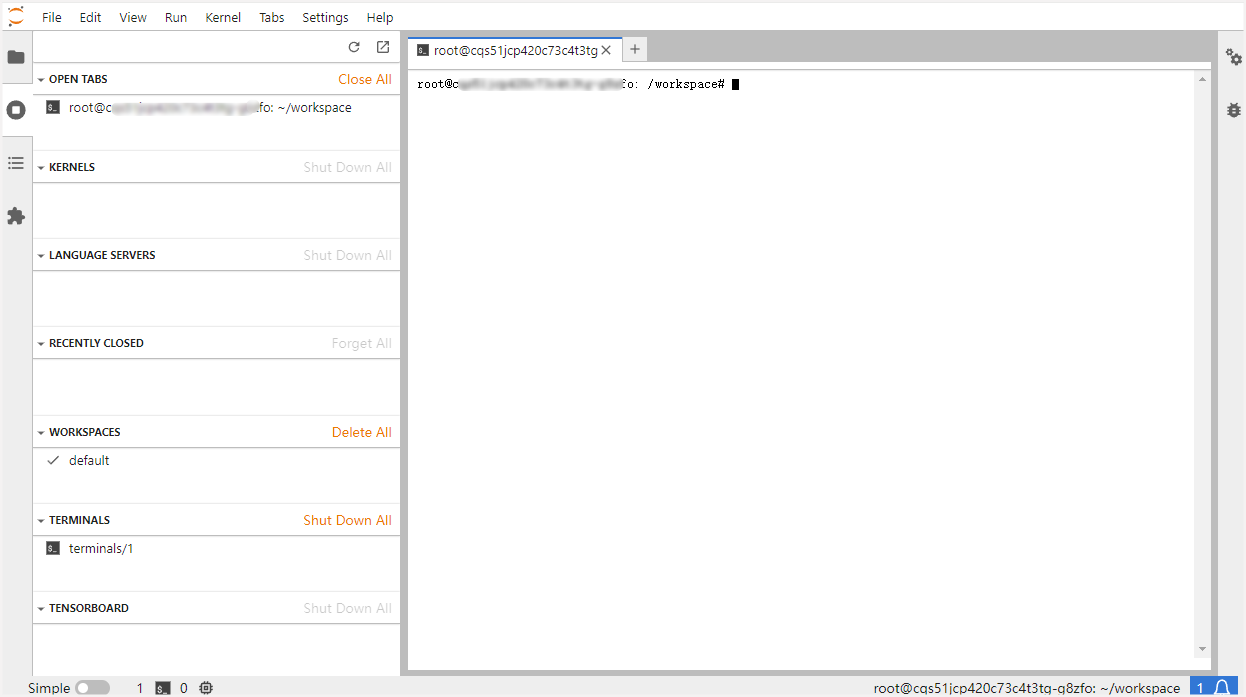
登录后一般会在 /root/workspace 目录下,服务器各个路径具体意义如下:
/:系统盘,替换镜像,重置系统时系统盘数据都会重置。/root/workspace:数据盘,支持扩容,保存镜像时此处数据不会重置。/root/shared-storage:共享文件存储,可跨实例存储。
SSH
SSH只是登录方式,工具可以是系统自带终端、Xshell、MobaXterm等。
SSH登录一般需要以下 4 个信息:
- 用户名:root
- 远程主机域名或IP(这里使用host域名):实例页面获取
- 端口号:实例页面获取
- 登录密码或密钥(这里使用密钥):前面创建实例时保存到本地的密钥
在实例页面获取主机host和端口号:

复制结果类似如下:
ssh -p 31729 root@gpu-s277r6fyqd.ssh.damodel.com其中,gpu-s277r6fyqd.ssh.damodel.com 即主机host,31729 为端口号。
终端登录方式详见SSH登录与密钥对。
部署LLama3.1
使用conda管理环境
我们使用 conda 管理环境,DAMODEL示例已经默认安装了 conda 24.5.0 ,直接创建环境即可:
conda create -n llama3 python=3.12环境创建好后,使用如下命令切换到新创建的环境:
conda activate llama3安装依赖
pip install langchain==0.1.15
pip install streamlit==1.36.0
pip install transformers==4.44.0
pip install accelerate==0.32.1
下载 Llama-3.1-8B 模型,平台已预制Llama-3.1-8B-Instruct模型,执行以下命令即可内网高速下载:
wget http://file.s3/damodel-openfile/Llama3/Llama-3.1-8B-Instruct.tar下载完成后解压缩/Llama-3.1-8B-Instruct.tar
tar -xf Llama-3.1-8B-Instruct.tar使用教程
新建 llamaBot.py 文件,编写代码加载模型及启动Web服务。
from transformers import AutoTokenizer, AutoModelForCausalLM
import torch
import streamlit as st

# 创建一个标题和一个副标题
st.title("💬 LLaMA3.1 Chatbot")
st.caption("🚀 A streamlit chatbot powered by Self-LLM")

# 定义模型路径
mode_name_or_path = '/root/workspace/Llama-3.1-8B-Instruct'

# 定义一个函数,用于获取模型和tokenizer
@st.cache_resource
def get_model():
    # 从预训练的模型中获取tokenizer
    tokenizer = AutoTokenizer.from_pretrained(mode_name_or_path, trust_remote_code=True)
    tokenizer.pad_token = tokenizer.eos_token
    # 从预训练的模型中获取模型,并设置模型参数
    model = AutoModelForCausalLM.from_pretrained(mode_name_or_path, torch_dtype=torch.bfloat16).cuda()

    return tokenizer, model

# 加载LLaMA3的model和tokenizer
tokenizer, model = get_model()

# 如果session_state中没有"messages",则创建一个包含默认消息的列表
if "messages" not in st.session_state:
    st.session_state["messages"] = []

# 遍历session_state中的所有消息,并显示在聊天界面上
for msg in st.session_state.messages:
    st.chat_message(msg["role"]).write(msg["content"])

# 如果用户在聊天输入框中输入了内容,则执行以下操作
if prompt := st.chat_input():

    # 在聊天界面上显示用户的输入
    st.chat_message("user").write(prompt)

    # 将用户输入添加到session_state中的messages列表中
    st.session_state.messages.append({"role": "user", "content": prompt})

    # 将对话输入模型,获得返回
    input_ids = tokenizer.apply_chat_template(st.session_state["messages"],tokenize=False,add_generation_prompt=True)
    model_inputs = tokenizer([input_ids], return_tensors="pt").to('cuda')
    generated_ids = model.generate(model_inputs.input_ids,max_new_tokens=512)
    generated_ids = [
        output_ids[len(input_ids):] for input_ids, output_ids in zip(model_inputs.input_ids, generated_ids)
    ]
    response = tokenizer.batch_decode(generated_ids, skip_special_tokens=True)[0]

    # 将模型的输出添加到session_state中的messages列表中
    st.session_state.messages.append({"role": "assistant", "content": response})
    # 在聊天界面上显示模型的输出
    st.chat_message("assistant").write(response)
    print(st.session_state)
在终端中运行以下命令,启动 streamlit 服务,server.port 可以更换端口:
streamlit run llamaBot.py --server.address 0.0.0.0 --server.port 1024需注意服务地址务必指定位0.0.0.0,否则无法通过浏览器访问
接下来我们需要通过丹摩平台提供的端口映射能力,把内网端口映射到公网
进入GPU 云实例页面,点击操作-更多-访问控制:

点击添加端口,添加streamlit服务对应端口:

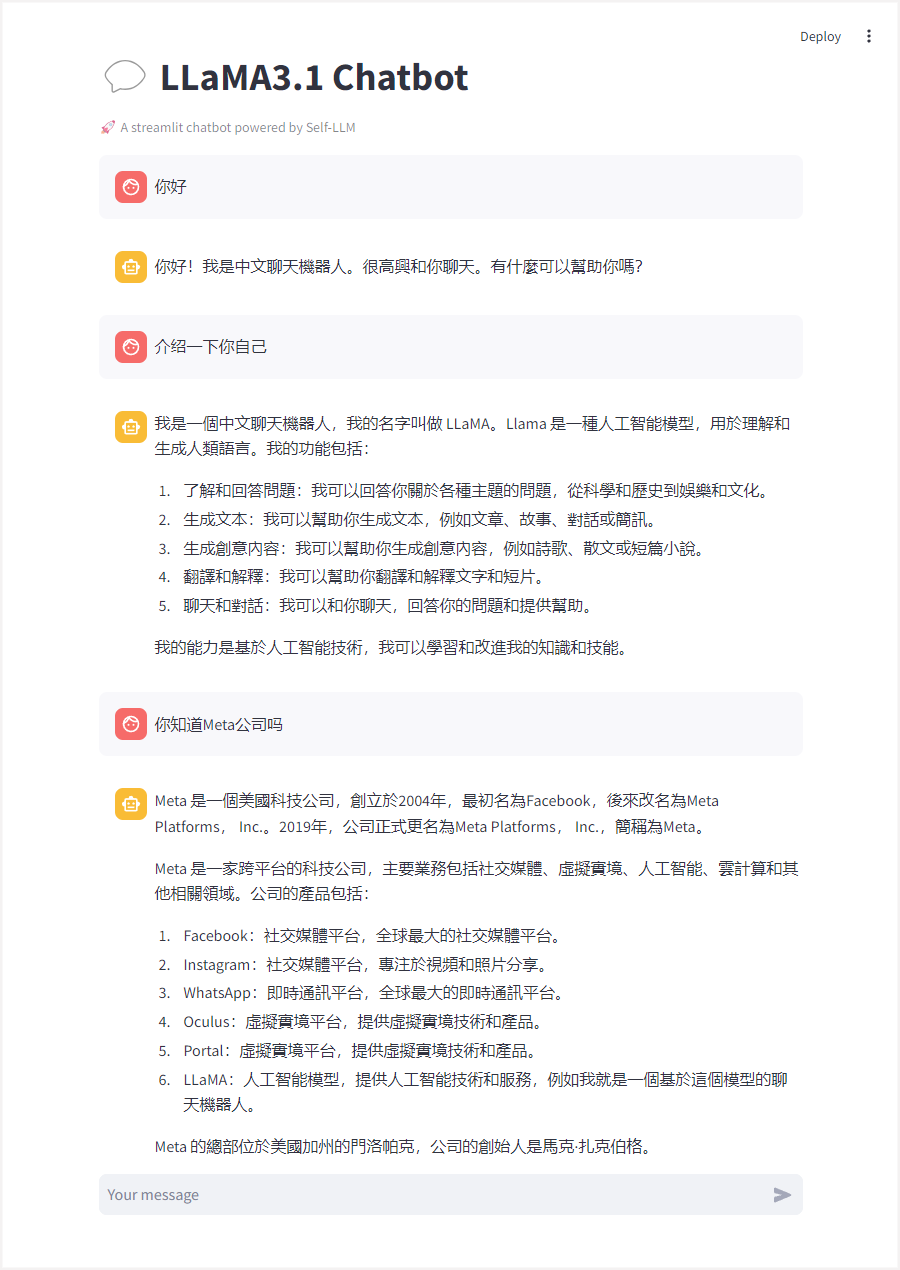
添加成功后,通过访问链接即即可打开LLaMA3.1 Chatbot交互界面,并与其对话:
更多推荐
 已为社区贡献3条内容




所有评论(0)